Resource Promotion: User guide
1. Introduction
This user guide explains how to perform basic resource promotion tasks using the Resource Promotion application. It is assumed the user has a basic familiarity with the use of a personal computer and a web browser.
Previous experience with other promotion or versioning tools will help you in getting started with Resource Promotion but is not essential.
1.1. What is resource promotion
Resource Promotion is a tool that allows business users to manage their resources and tasks by collaborating and promoting resources (primarily templates and related resources) to different pre-configured environments. Generally speaking, when working with templates and related resources you will want to have a number of different environments that correspond with how the resources are used. For example, a common set of environments is:
-
Draft
-
Staging
-
Production
In this example, you would start making changes in the draft environment and you can promote them to the staging environment when the changes are accepted. After intensive testing, the changes can be promoted to the production environment. This allows you to have a clean separation between multiple sets of your resources and gives you more control over the quality of the changes that end up on your production system. Environments exist within the scope of a project and can be defined when creating a project.
Usually, when making changes to resources you will want to keep related changes grouped somehow. A task allows you to carry the changes you made to a set of resources between environments. An example of a task would be Translate promotion letter to French. Tasks can be promoted between environments when they are accepted, or they can be pushed back to an earlier environment by rejecting them. Tasks exist within the scope of a project.
Resource Promotion allows you to manage tasks with resources across multiple environments and supports the following task related activities:
Resource Promotion is a web application. In computing, a web application or web app is a client–server application in which the client (or user interface) runs in a web browser.
1.2. Concepts
Project
A project is a collection of environments and tasks that allows your team to coordinate the development of communications. Any environment or task always exists within the scope of a single project. Each project has a name and an optional description.
A project is defined according to your organisation’s requirements. For example, a project could be:
-
a marketing campaign
-
an invoicing system
-
all tasks for a certain department
-
all tasks related to a certain product
-
…
Environment
An environment is an isolated set of resources to which changes can be applied by promoting tasks. The list of environments is defined when creating a project and the order of environments is vital since tasks always follow the chain of environments. An environment has an associated base path which is where the resources will be stored. The list of environments cannot be changed after a project was created. Each environment has a name that should describe its intended use, e.g. Production.
Task
A task groups a set of changes to resources. A task has a title and an optional description. A task needs to have a set of (changed) resources assigned to it. The changes to the resources of a task will carry over to the next environment once the task is promoted.
Resource
A resource is a file and is identified by a path. Resources can be assigned to tasks and tasks can be promoted between environments. When a task is promoted, the contents of the specific version of the resource is promoted to the next environment. The contents of this version is then used for each environment that is promoted to.
Resource version
A resource can have different contents in different environments. Each change to a resource becomes a new version of the resource once a task with that resource is promoted to the next environment. A version of a resource is identified by the date and time at which the resource was promoted. The contents of this version of the resource is then used for the resource in each environment that is promoted to.
1.3. Overview
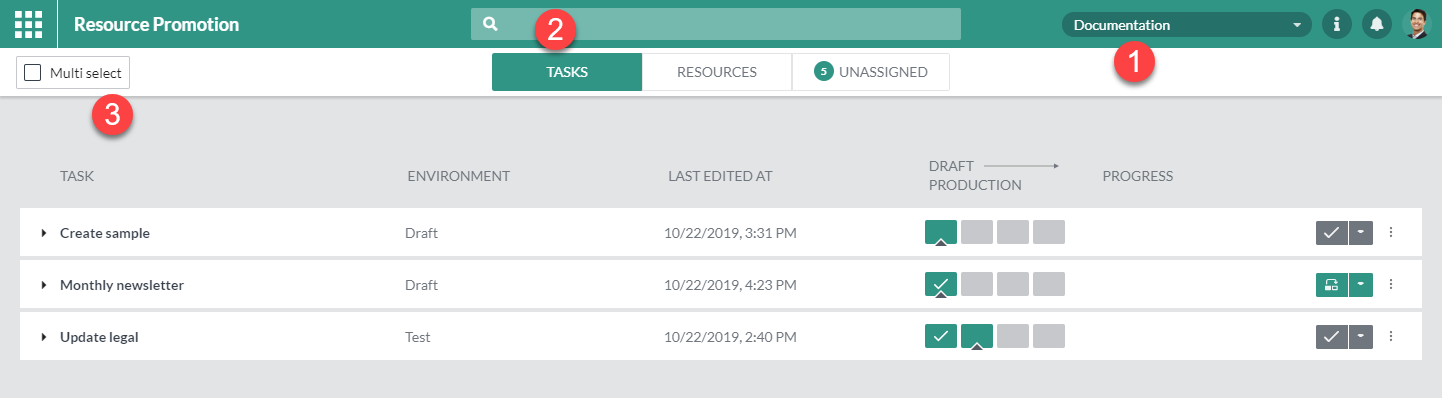
| 1 | The project switcher |
| 2 | The search bar |
| 3 | The multi select mode switcher |
Project switcher
The project switcher allows you to change the active project. Only the tasks for the active project will be shown. If there is only one project, the project switcher will be hidden. When having multiple projects, to change the active project simply click the dropdown and select the project you want to work on.
Search bar
The search bar is located at the top and allows you to search for tasks and resources. It will search the task titles, descriptions, environment names and resource names and show matching tasks or resources based on which view is currently active. To perform a search, simply enter the text you are looking for and the currently active view will update with the matching tasks or resources.
Multi select

| 1 | Multi select actions |
| 2 | Multi select checkboxes |
To make it easier to perform certain actions on multiple tasks at once, you can switch to multi select mode. This can be done by clicking the multi select button in the top left corner on the white top bar. Once in multi select mode, you can check multiple tasks by using the checkbox in front of the task name. On the top right on the white top bar you can find the actions that you can perform on the selected tasks such as promote, accept, reject and abort.
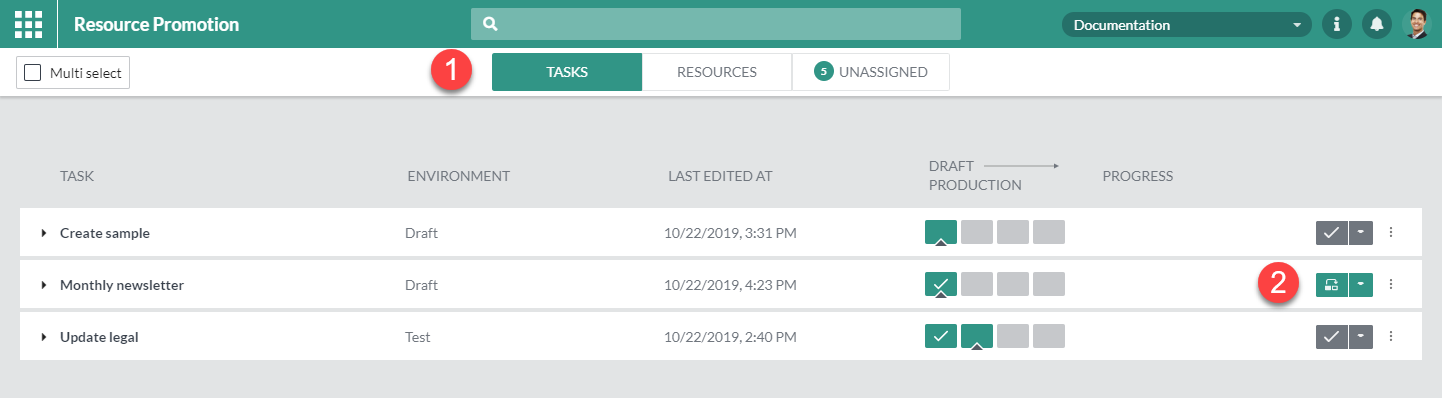
2. Task overview
The Task overview page lists all the tasks in the project that are currently open. Each task can be expanded to show the list of resources that are assigned to the selected task.
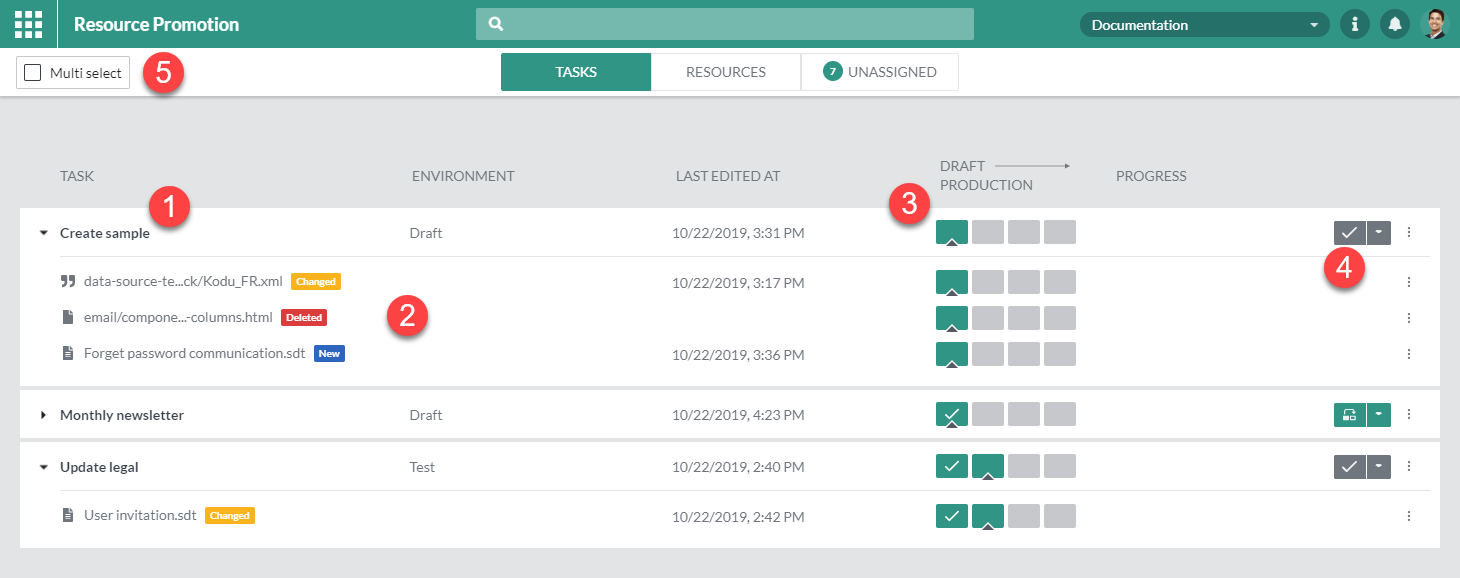
| 1 | The name of the task. |
| 2 | The list of resources that is currently assigned. The table also shows the current environment for the task, as well as the date and time when it was last modified. |
| 3 | The progress bar of both the task and state of its assigned resources (across multiple environments). |
| 4 | Actions you can perform on a task |
| 5 | This button allows switching to multi-select mode, in this mode you can perform operations on multiple tasks in batch. |
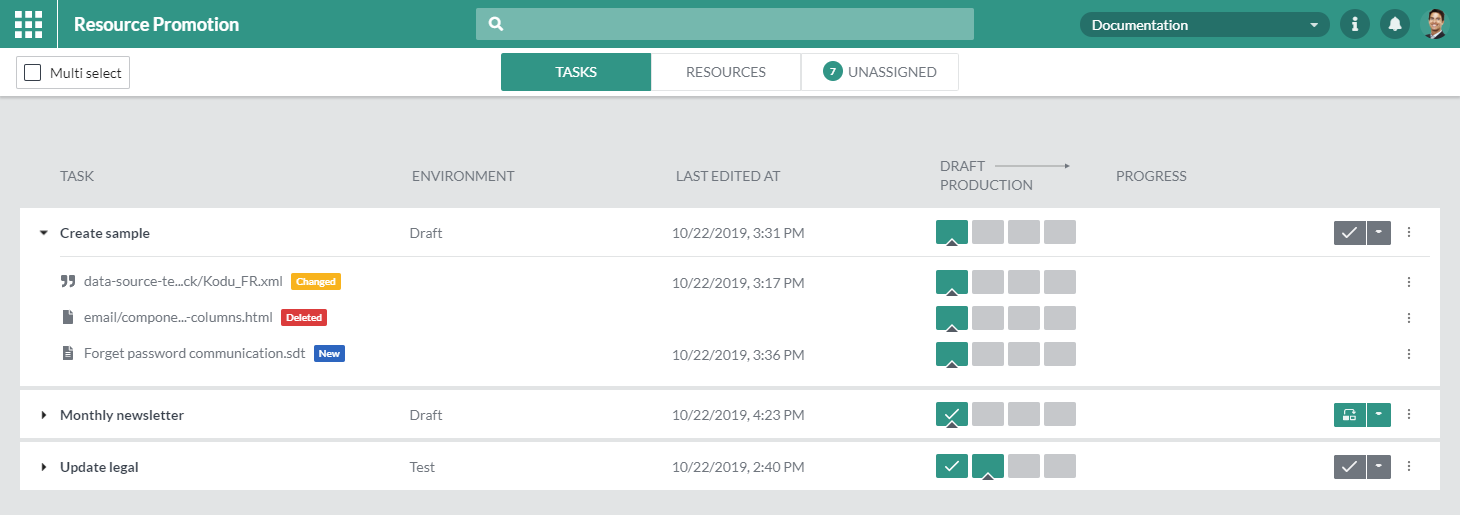
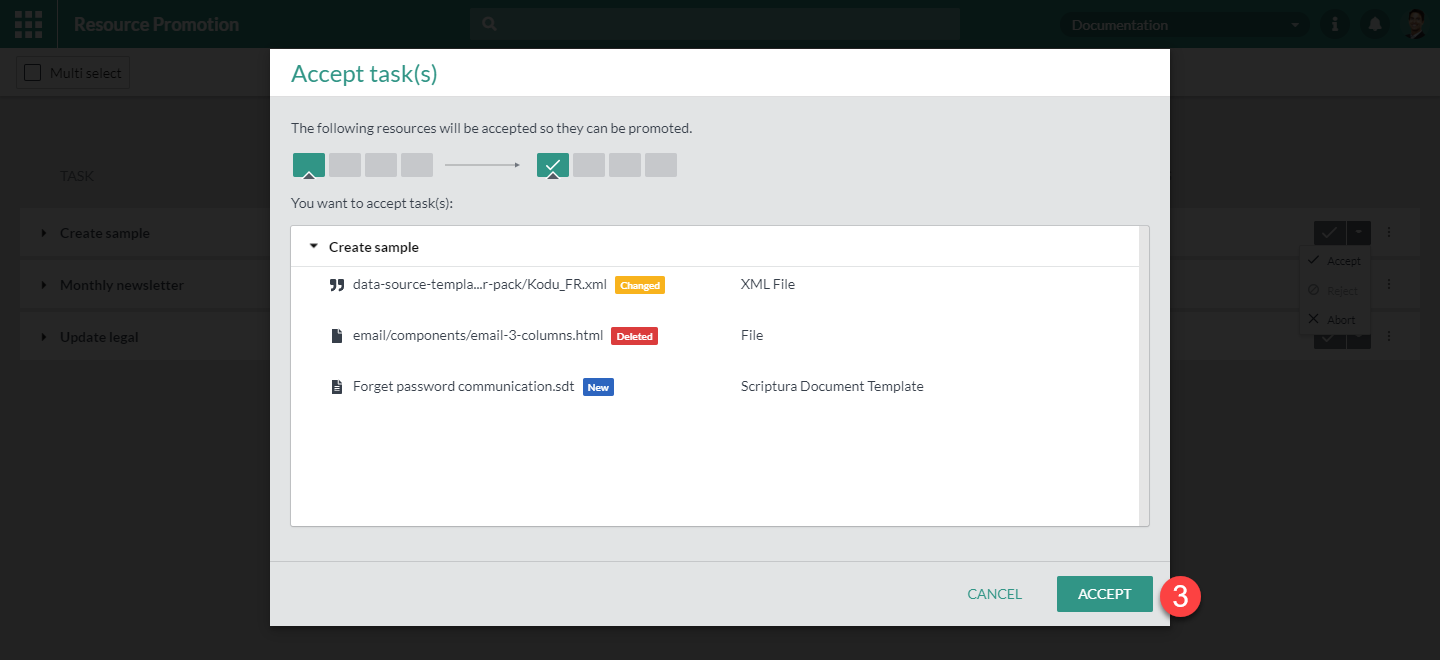
2.1. Resource labels
-
New: The file is new and will be created in all next environments upon promotion.
-
Delete: The file already exists but has been deleted. The file will be removed in all next environments upon promotion.
-
Changed: The file already exists but has been changed. The file will be adapted in all next environments upon promotion.
3. Resources overview
The Resources resources overview page lists all the resources in the project that are currently assigned to at least one task. Each resource can be expanded to show the list of tasks to which this resource is assigned.
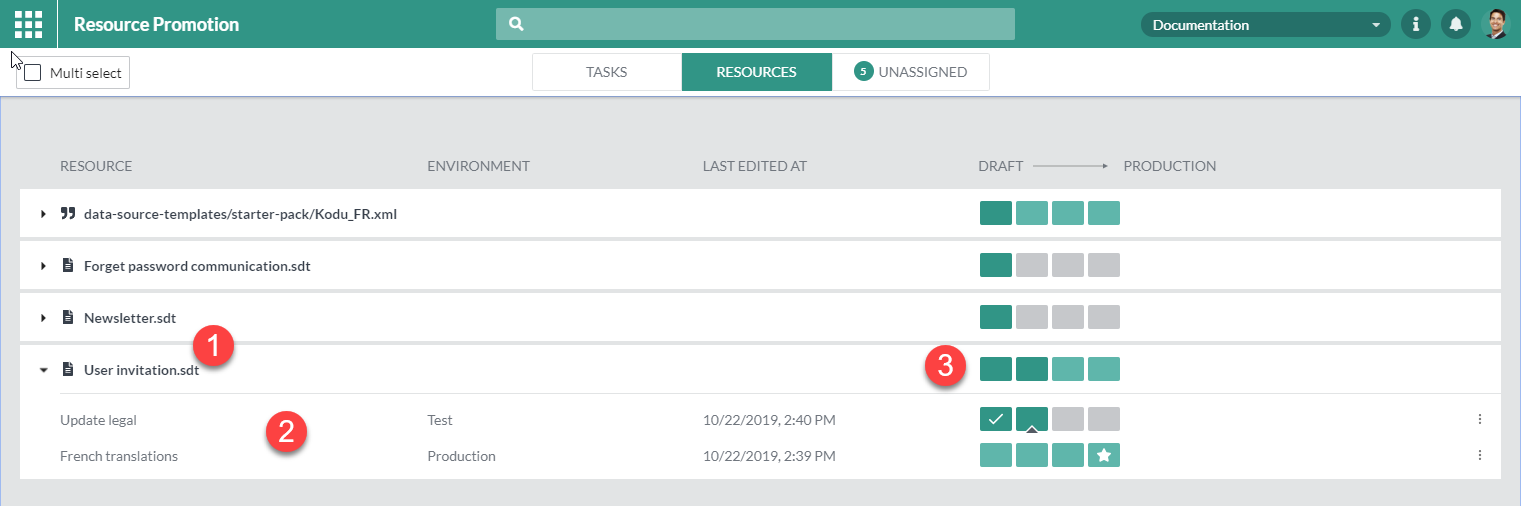
| 1 | The path to the resource, relative to the environment’s basepath. |
| 2 | The list of tasks to which the resource is currently assigned. The table also shows the current environment for the task, as well as the date and time when it was last modified. |
| 3 | The progress bar of both the resource (across multiple environments) and tasks. |
4. Unassigned resources overview
The Unassigned resources overview page lists all the modified resources in the project that have not yet been assigned to a task. From this page you can assign resources to an existing task, or create a new task alltogether and immediately assign the resource to it.

| 1 | The path to the resource, relative to the environment’s basepath. |
| 2 | The environment of the resource. |
| 3 | The date and time of the last modification to the resource. |
| 4 | A resource that was recently assigned to a task. |
| 5 | The dropdown that can be used to assign a resource to a task. |
| 6 | The status indicator informing you whether the assignment to the resource was succesful. In case of an error, you can hover this icon to see the reason of the failure. |
The dropdown to assign a resource to a task acts as a filter. Enter the start of an existing task to filter the list of options. Only tasks that are currently in the same environment as the resource will be shown.
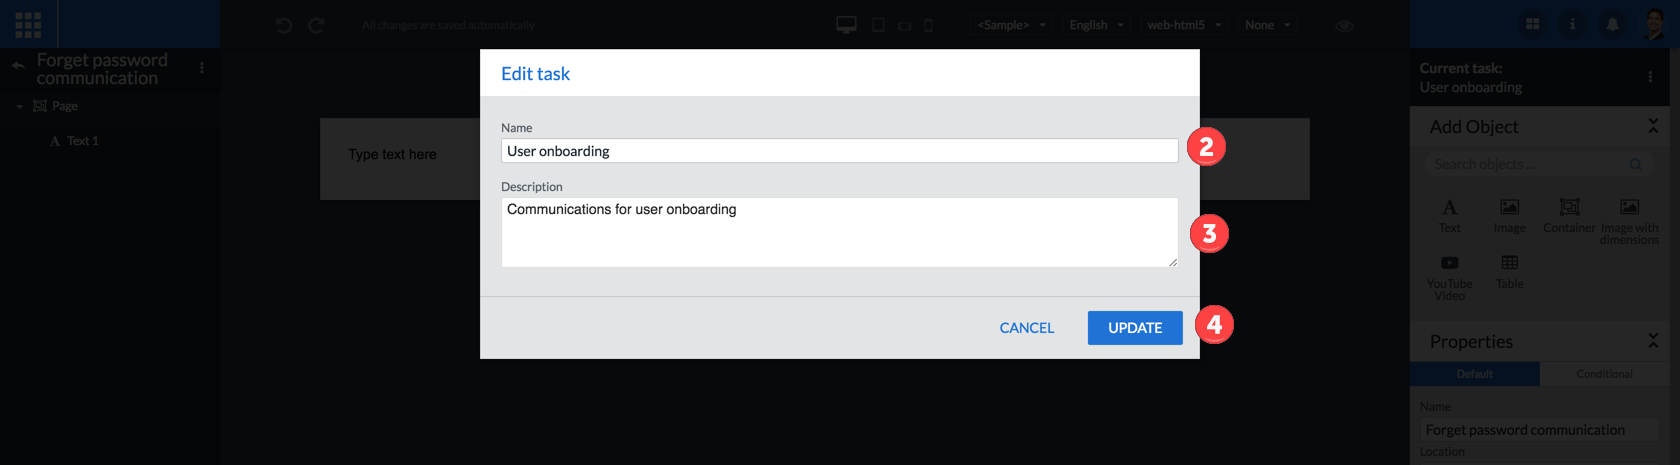
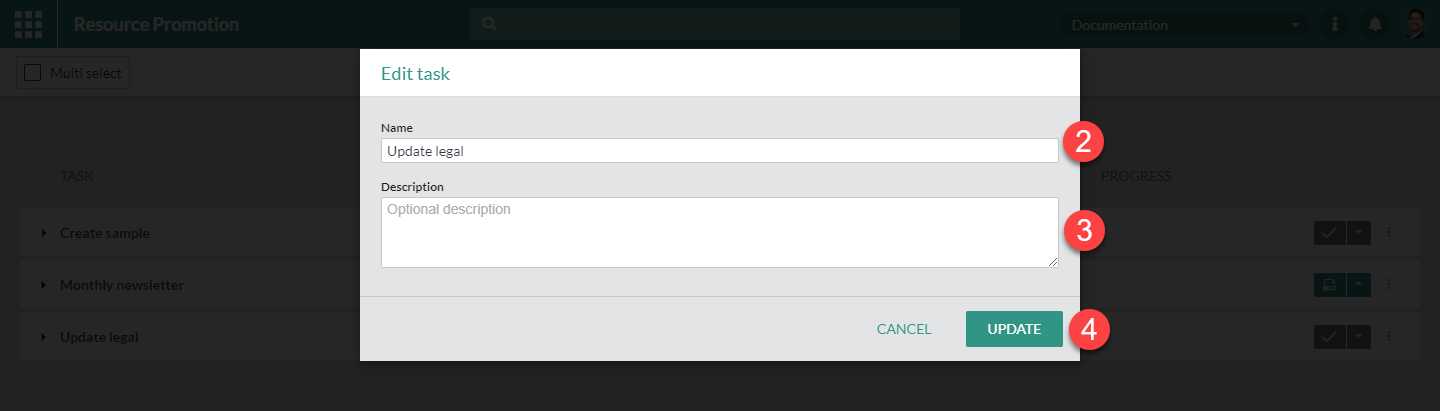
It is also possible to create a new task by simply entering the desired name of the new task. Doing this will open the following dialog.
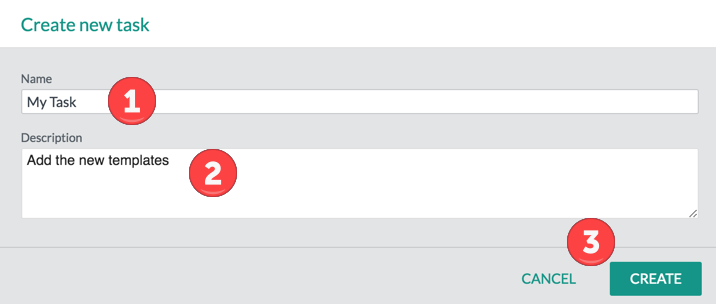
| 1 | The name of the new task. |
| 2 | An optional description for the new task. |
| 3 | Pressing the create button will create the task and immediately assign the resource to this new task. The cancel button will just close the dialog without performing any operation, leaving the resource unassigned. |
| Both the name and the description of the task can still be modified at a later time, either through the Task overview or in the Web Designer Template Editor. |
5. Task actions
5.1. Accept
Accepting a task means approving all changes to its resources and making them promotable.
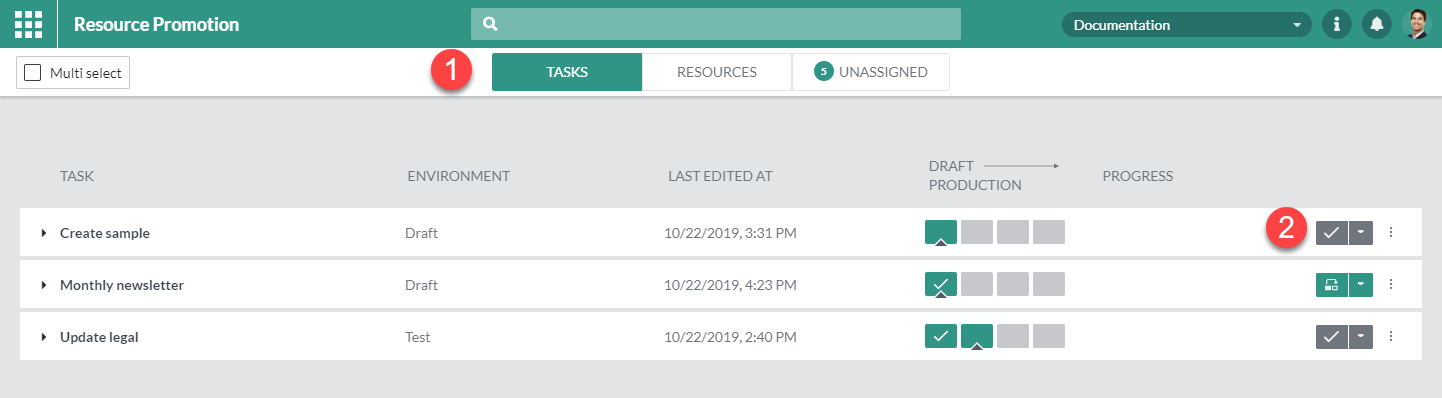
| 1 | Select the tasks tab |
| 2 | Click the accept icon |
| 3 | Click the accept button |
| Changing files of an accepted task is possible. If this happens the task will no longer be promotable until it is accepted again. |

5.2. Promote
Promoting a task means copying all resource changes to the next environment.
| When promoting a task to the final environment it will be closed permanently. |

| 1 | Select the tasks tab |
| 2 | Click the promote icon |
| 3 | Click the promote button |
5.3. Reject
Rejecting a task will prevent resource changes from being promoted to the next environment by setting the task back to its starting point. This is typically done when changes are found to be wrong or not perceived as ready for promotion and need to be corrected first.
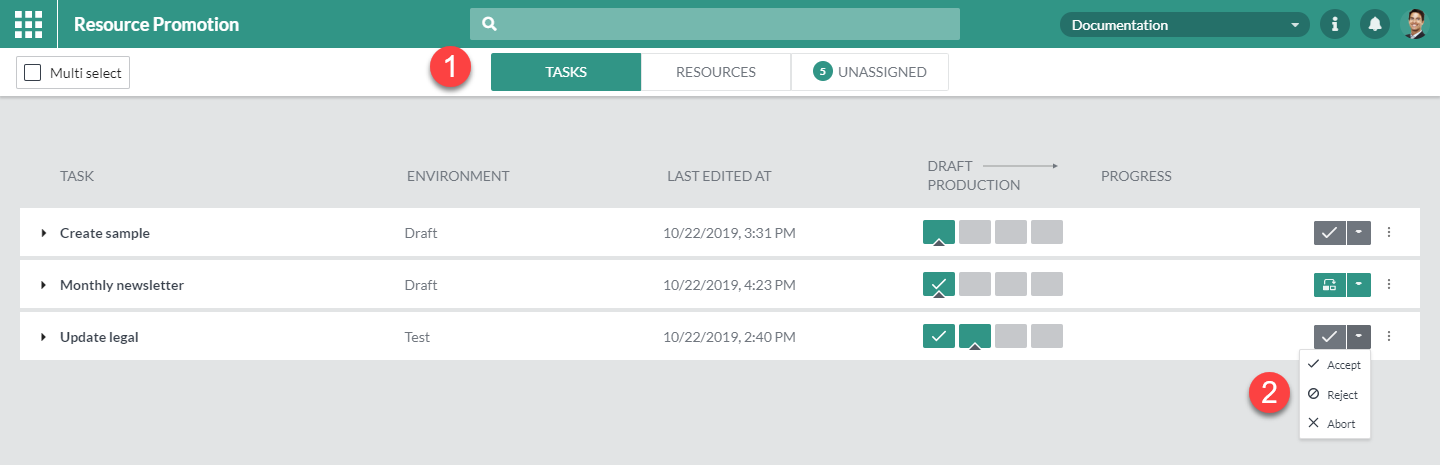
| 1 | Select the tasks tab |
| 2 | Click the reject button under the dropdown |
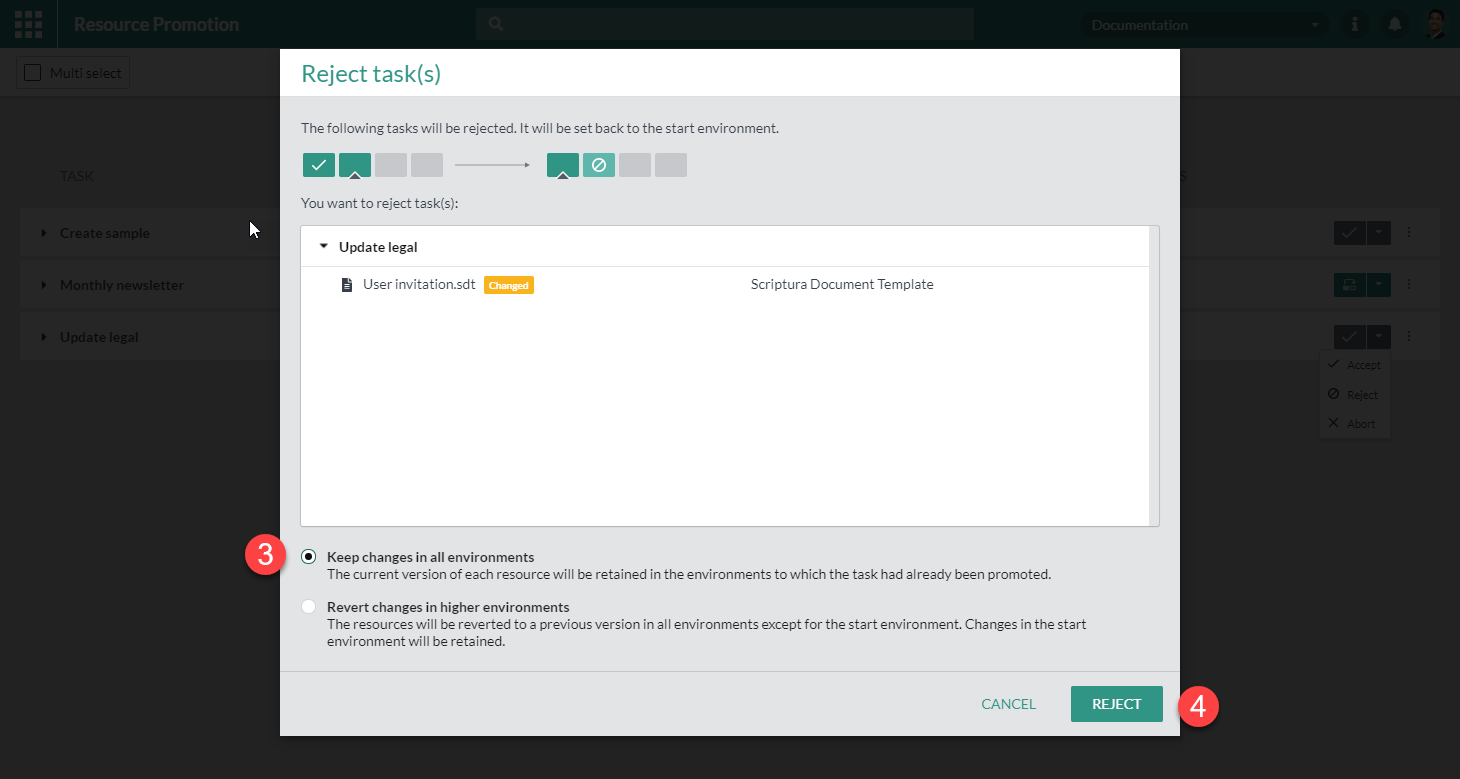
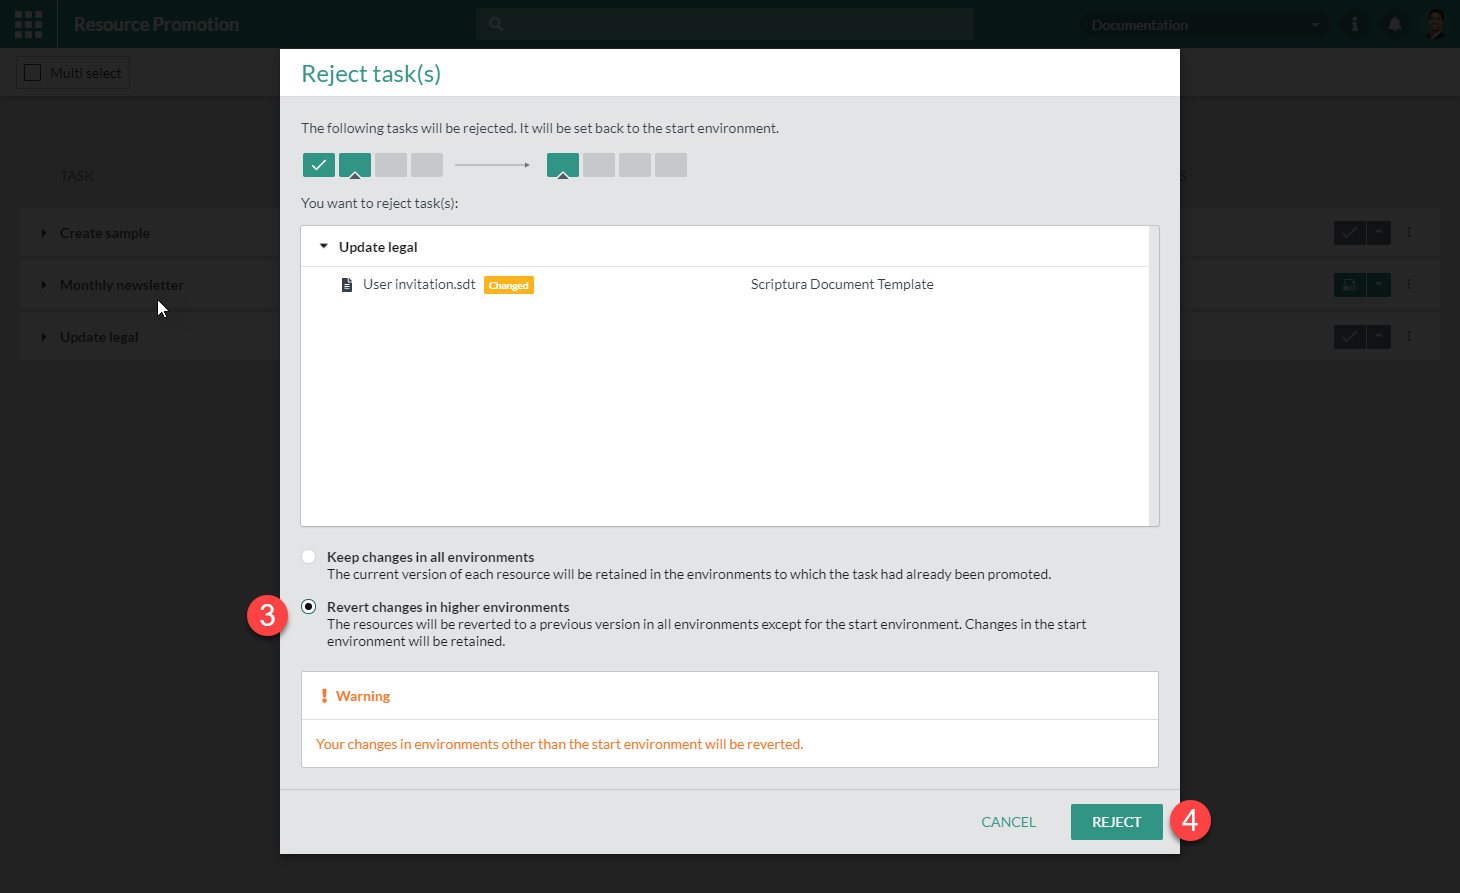
| 3 | Choose wether to keep or revert changes to any of your task’s files |
| 4 | Click the reject button |
|
Keep/revert changes has the following impact during a reject action |

5.4. Abort
Aborting a task means forcefully closing a task making it impossible to perform any future actions on it.
|
All files assigned to a task will become useable again in other tasks after it has been aborted. |
|
This is a destructive action. The task will be aborted and it will no longer be possible to perform any actions on it. |
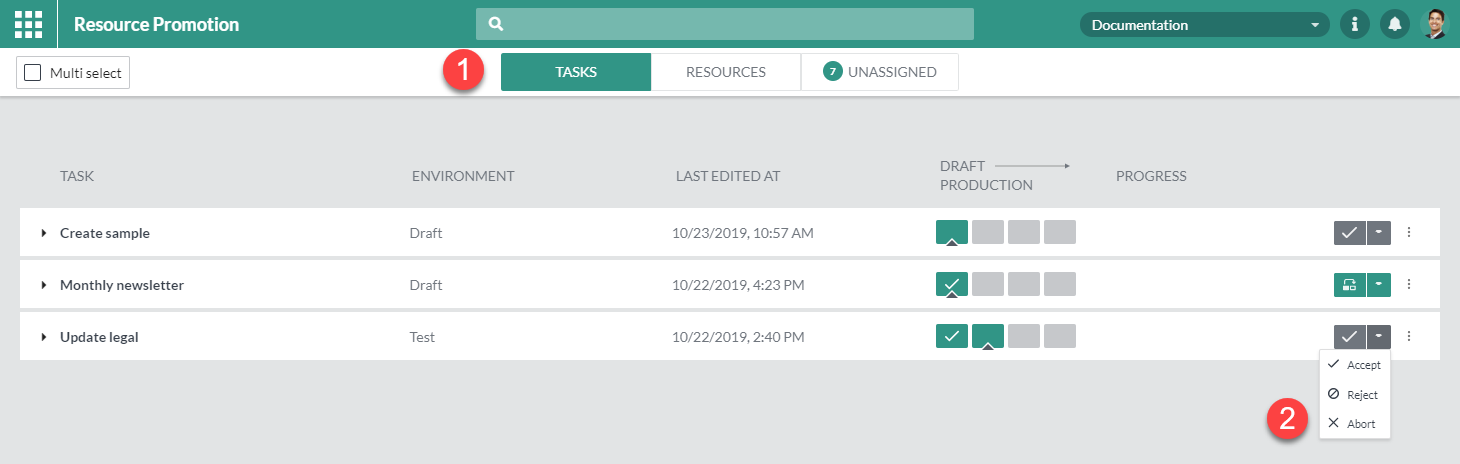
| 1 | Select the tasks tab |
| 2 | Click the abort button under the dropdown |
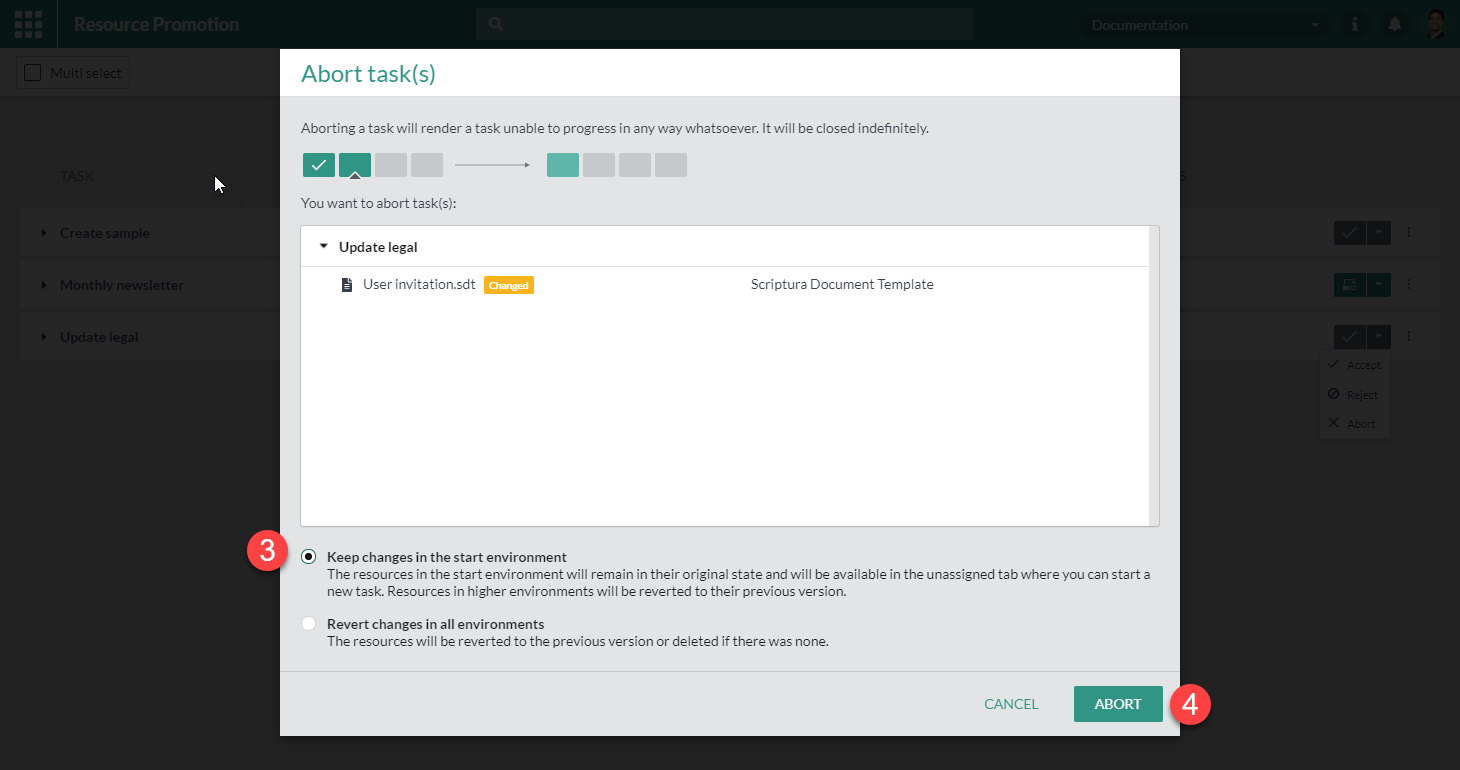
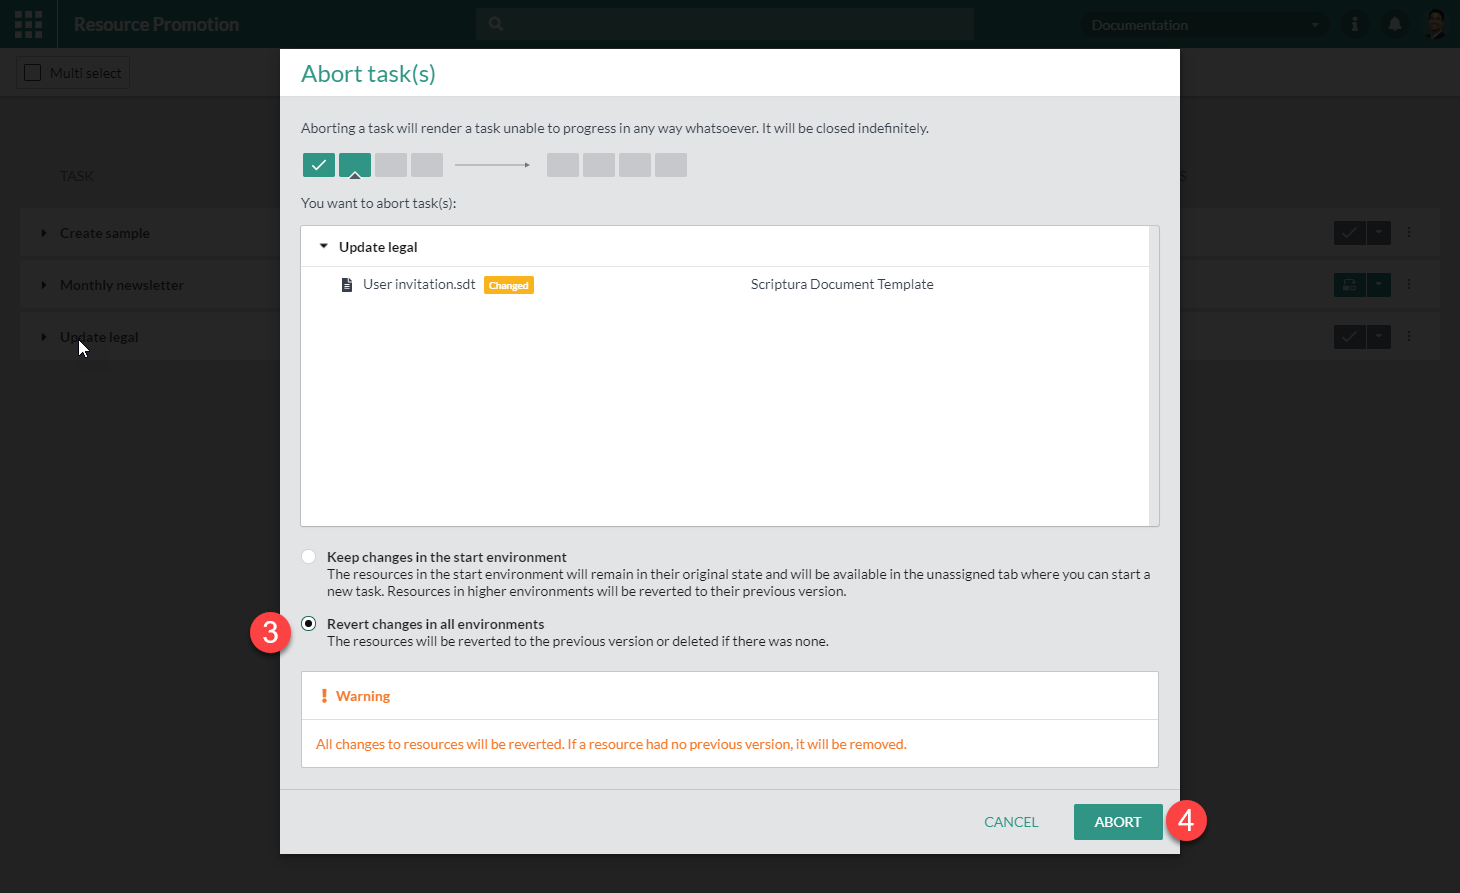
| 3 | Choose wether to keep or revert changes to any of your task’s files |
| 4 | Click the abort button |
|
Keep/revert changes has the following impact during an abort action |

6. Resource Actions
6.1. Assign
You can assign resources to tasks in a couple of ways. The first option is directly in the Web Designer while editing your templates. This procedure is described in Create a draft version. The other option is by going to the unassigned tab in the resource promotion application. Unassigned resources are resources which contain changes in a particular environment and not already assigned to a task. On this screen, you can assign these to a task with the following steps.
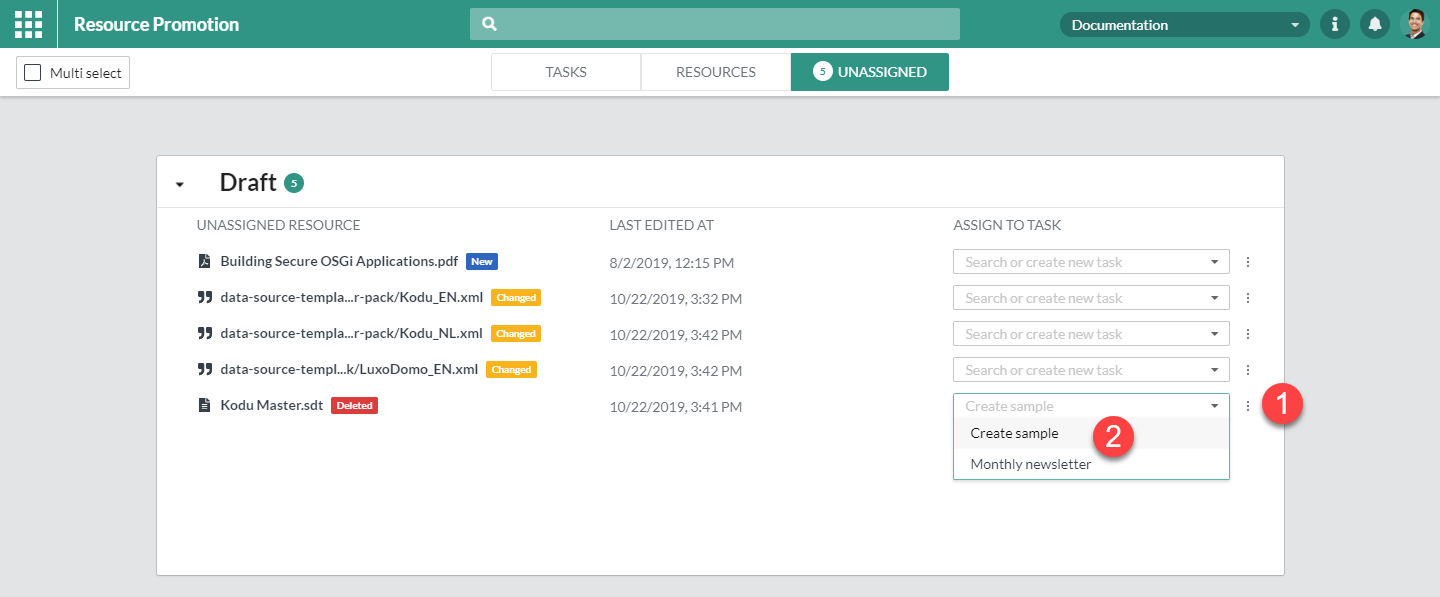
| 1 | Open the dropdown |
| 2 | Select an existing task or type a name if you want to create a new task |
6.2. Unassign
If you want to assign a resource to another task you first have to remove it from the current one. After you unassigned the resource it will appear again in the unassigned tab.
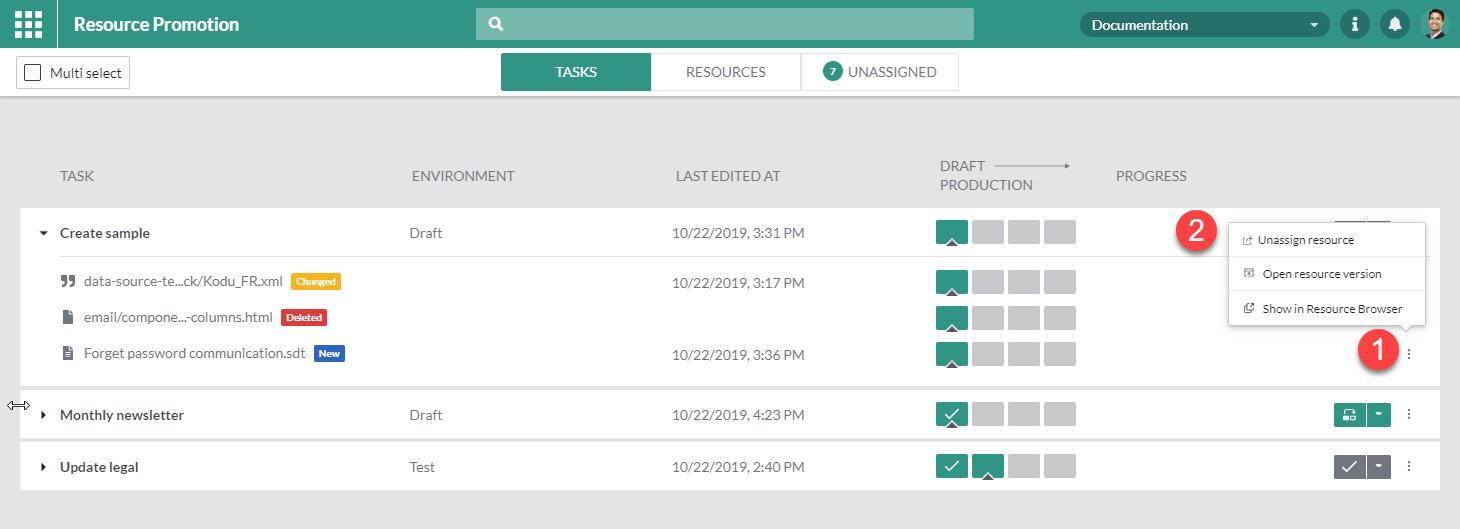

| 1 | Click the next to the resource you want to unassign |
| 2 | Select Unassign resource from the options |
| 3 | Confirm by clicking UNASSIGN |
6.3. Discard changes
You can discard changes on unassigned resources from within the Unassigned tab. This action will revert the resource back to how it was before you changed it.
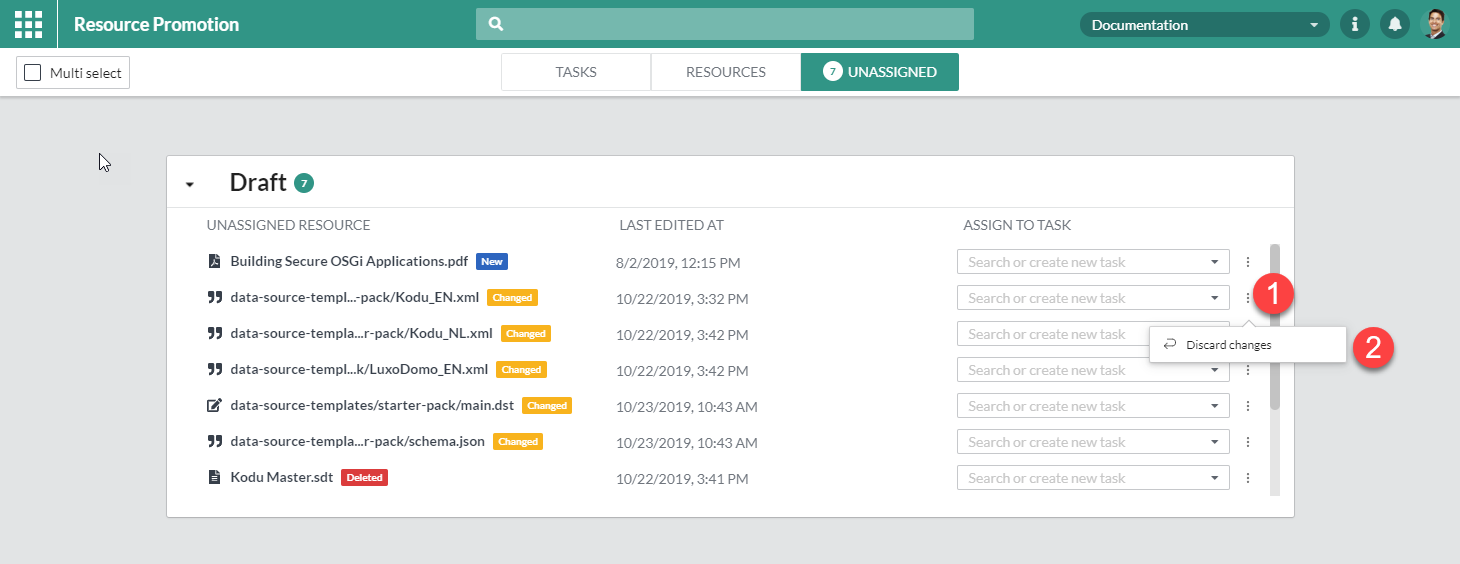
|
Discarding changes on a new resource will result in removing that resource. |
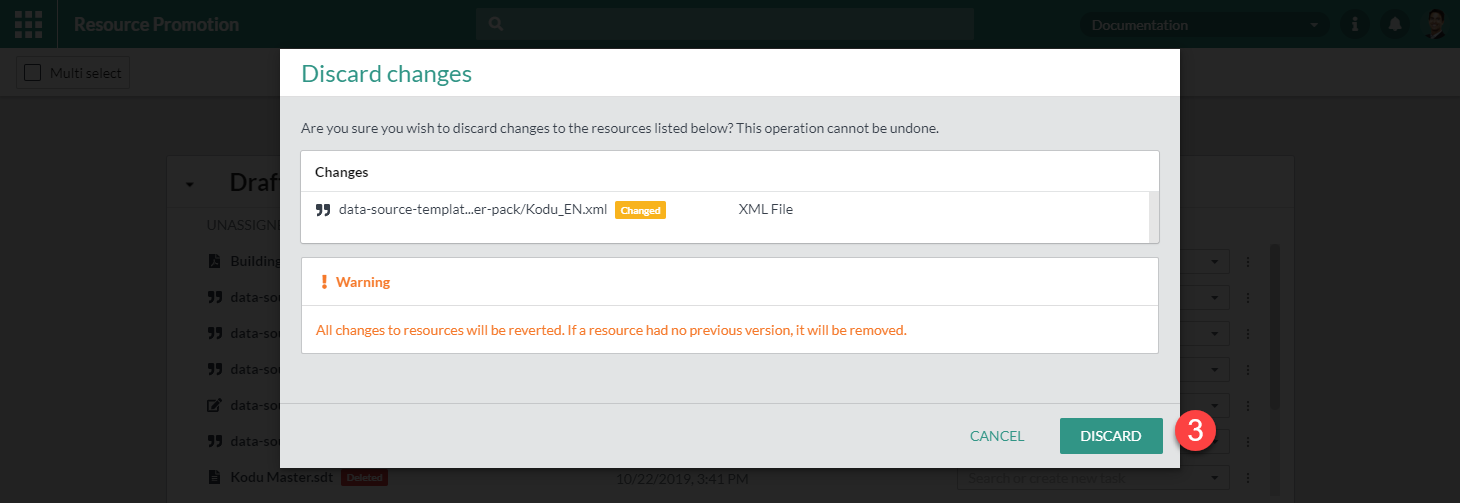
| 1 | Click the next to the resource where you want to discard the changes |
| 2 | Select Discard changes from the options |
| 3 | Confirm by clicking DISCARD |
7. Task Actions & Legenda

7.2. Operation states
Some task actions take a while to complete because they involve moving a lot of resources to a different stage in the promotion process. As these actions are handled asynchronously, the user receives information about the progress of the operation by the following states.
7.2.1. Pending
The request for the task operation is successful and is queued to be picked up.

| 1 | Name of the action |


8. Resource browser documentation
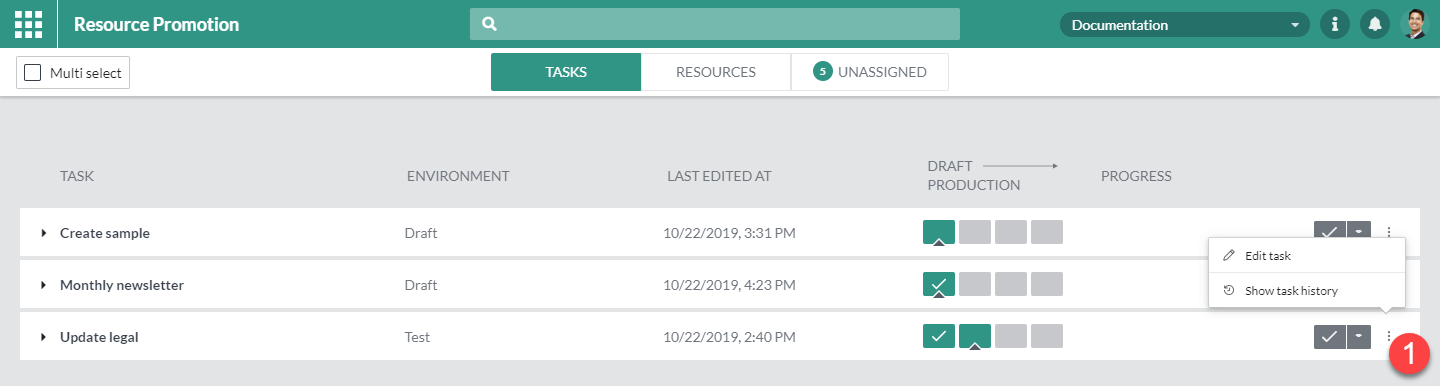
8.1. Resource history overview
A resource can have many versions over time. You can see an overview of all the versions in the resource browser. Each environment can have a different history for a resource due to temporary fix tasks applied to them.
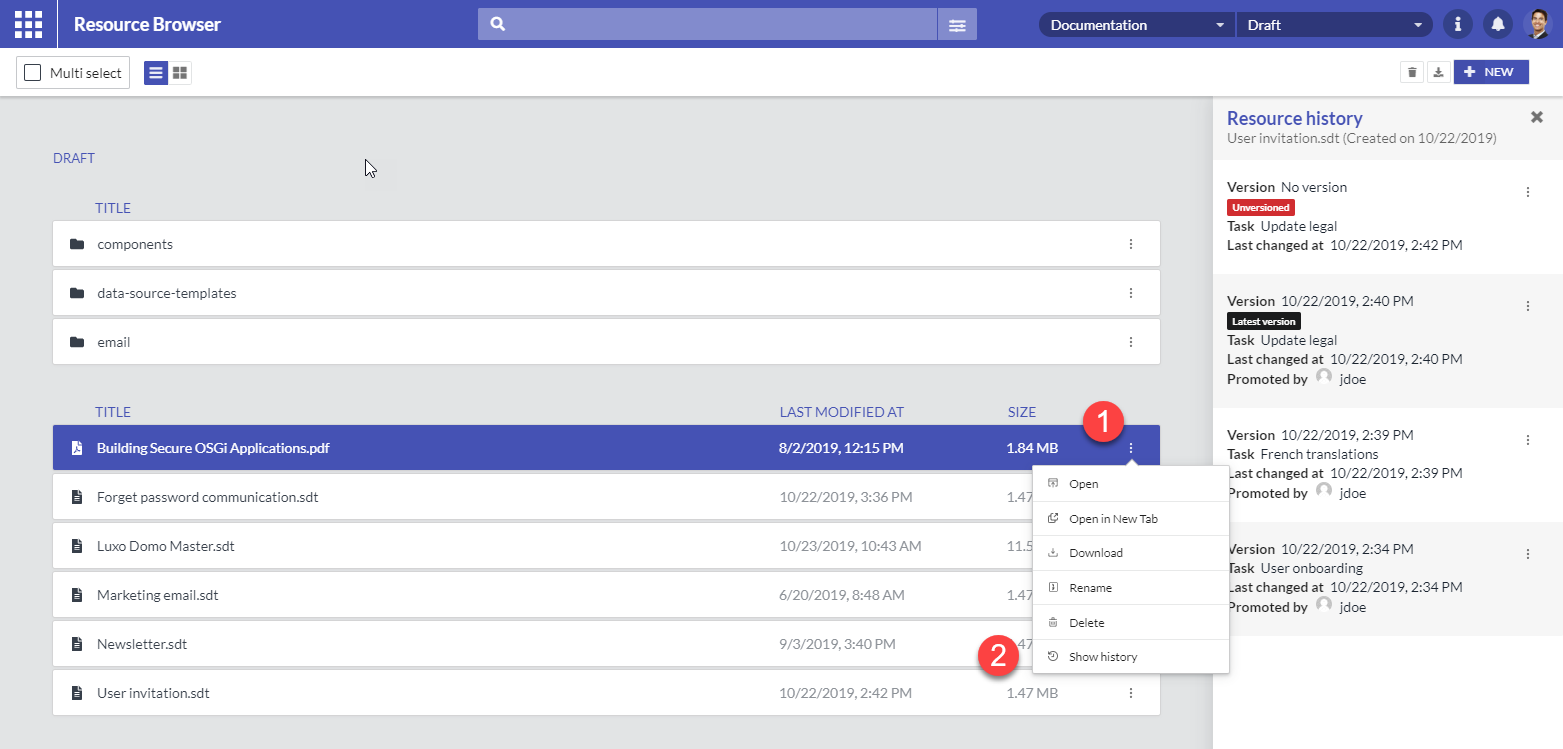
| 1 | Click the icon or right click the resource |
| 2 | Select Show History from the options |
-
Version: Date and time when the version was created. This is not necessarily the same date as the
Last changed atdate. -
Task: The task to which the resource is assigned
-
Last changed at: Date and time when the resource was last changed.
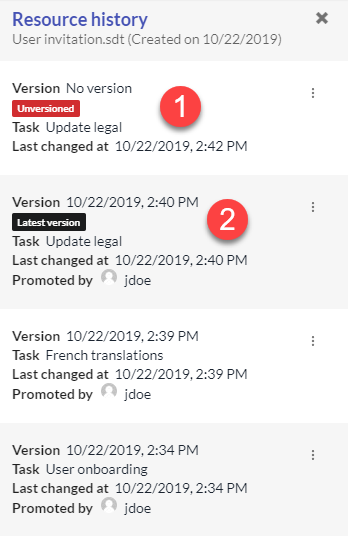
| 1 | Unversioned resource: this resource is not yet promoted and contains changes. |
| 2 | Latest version: This is the last promoted resource for the environment. |
8.2. Revert
You can go back to an earlier version of a resource by reverting it. This is done in the resource history overview.
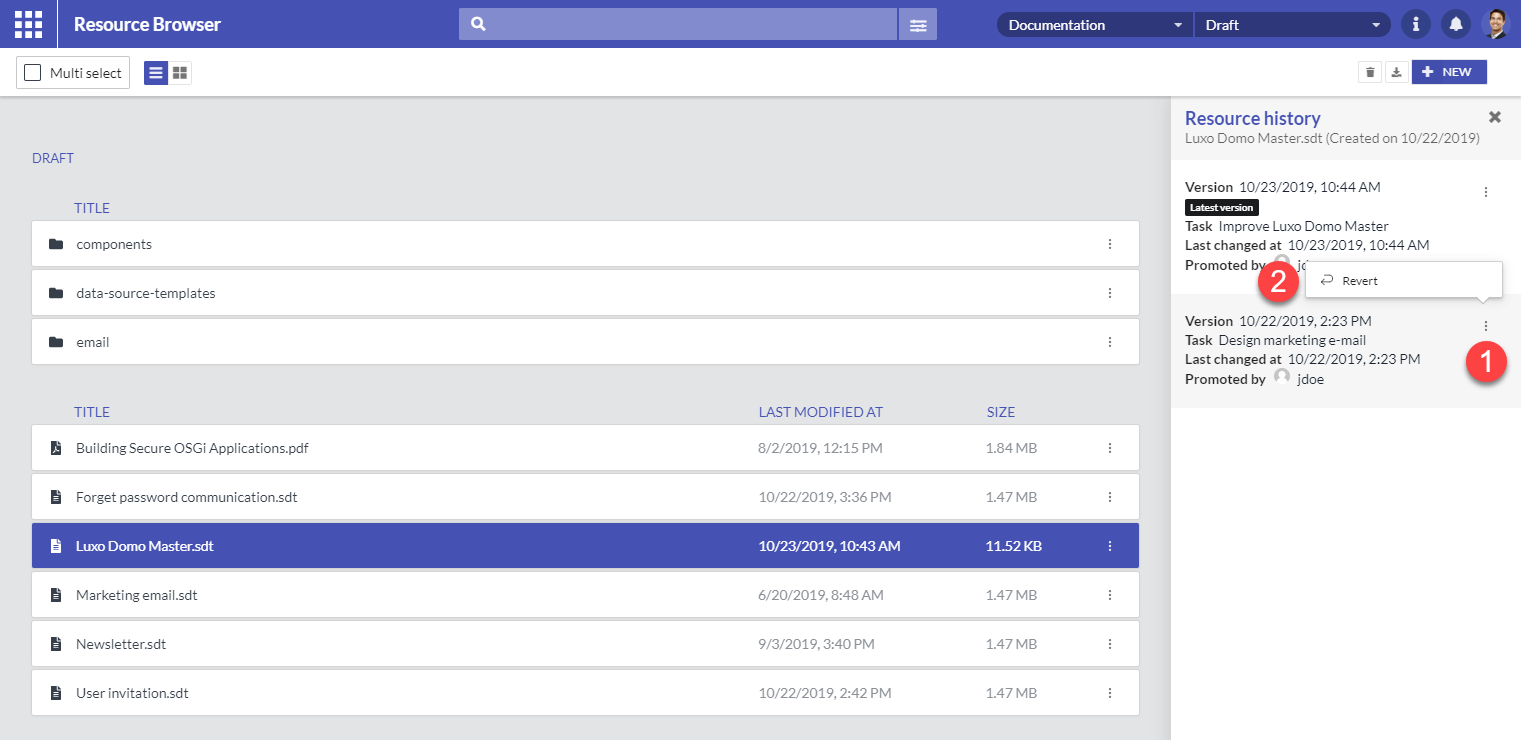
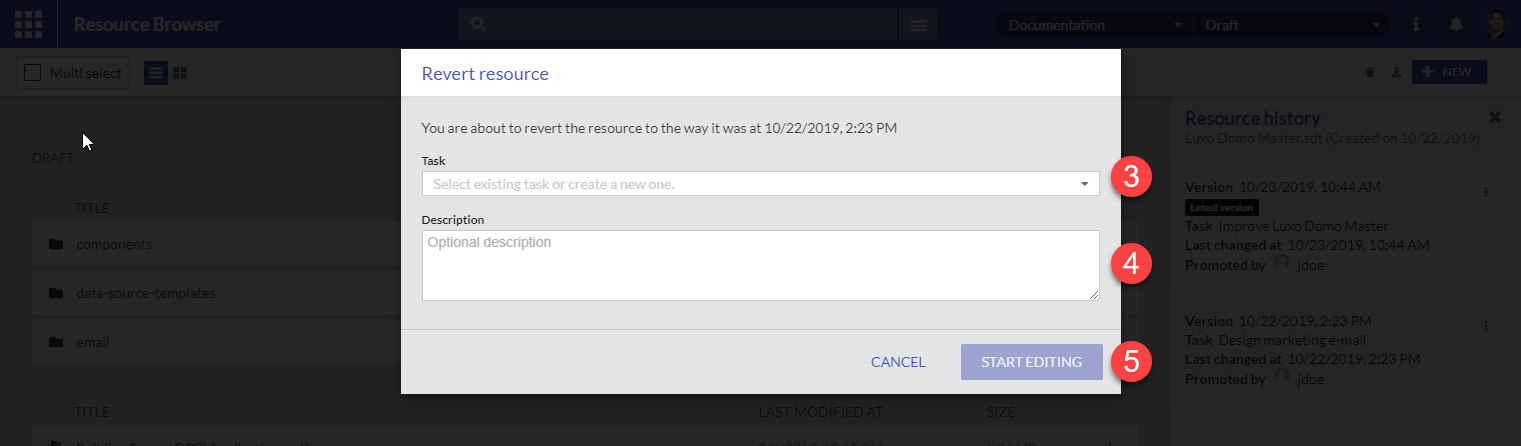
| 1 | Click on next to the version you want to revert to |
| 2 | Select Revert from the options |
| 3 | Select an existing task or create a new one |
| 4 | Update the description (Optional) |
| 5 | Click START EDITING |
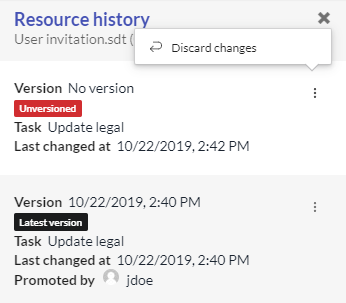
8.3. Discard changes
You can discard changes to a file by clicking the Discard changes button in the resource history overview.
This option is only available for files which contain the unversioned label meaning it contains changes which haven’t been promoted yet.
| Discarding changes on a file that has no previous version will result in the removal of said file. |
9. Web Designer integration
9.1. Create a draft version
You have the option to create a draft version of a template directly in the Web Designer if you create or edit a template in the first environment. You do this by following these steps.

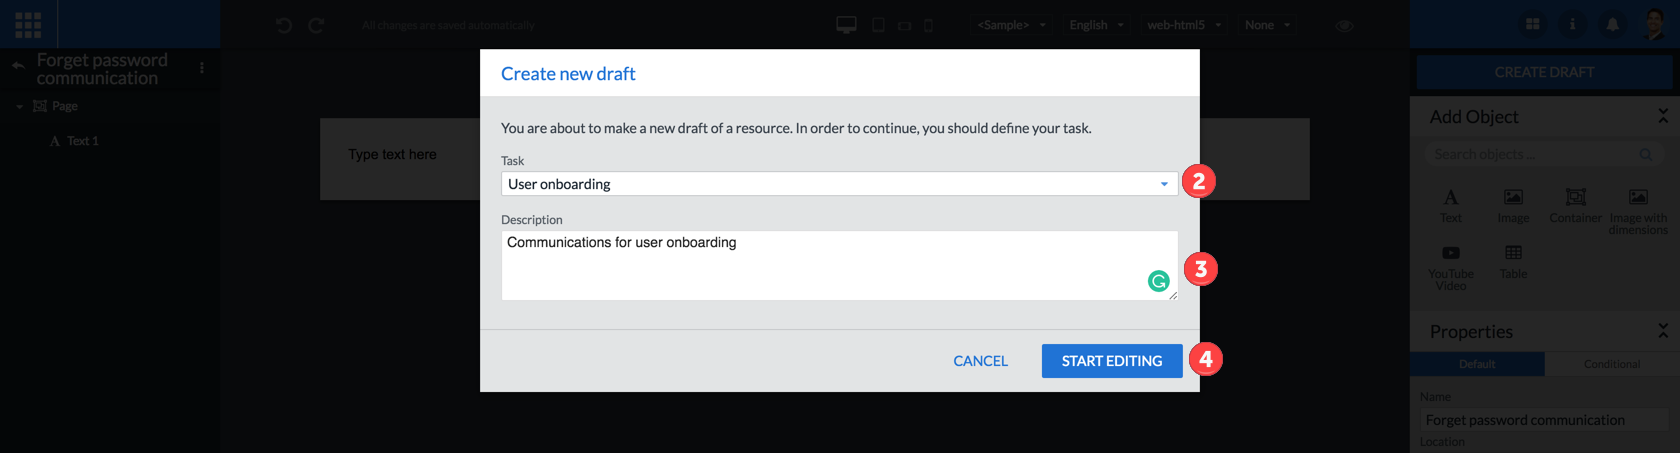
| 1 | Click the CREATE DRAFT Button |
| 2 | Choose an existing task or type the name for a new one |
| 3 | Optional: Edit the description |
| 4 | Click START EDITING |
9.2. Create a temporary fix
Creating or editing a template in a higher environment will give you the option to create a temporary fix. You do this by following these steps.

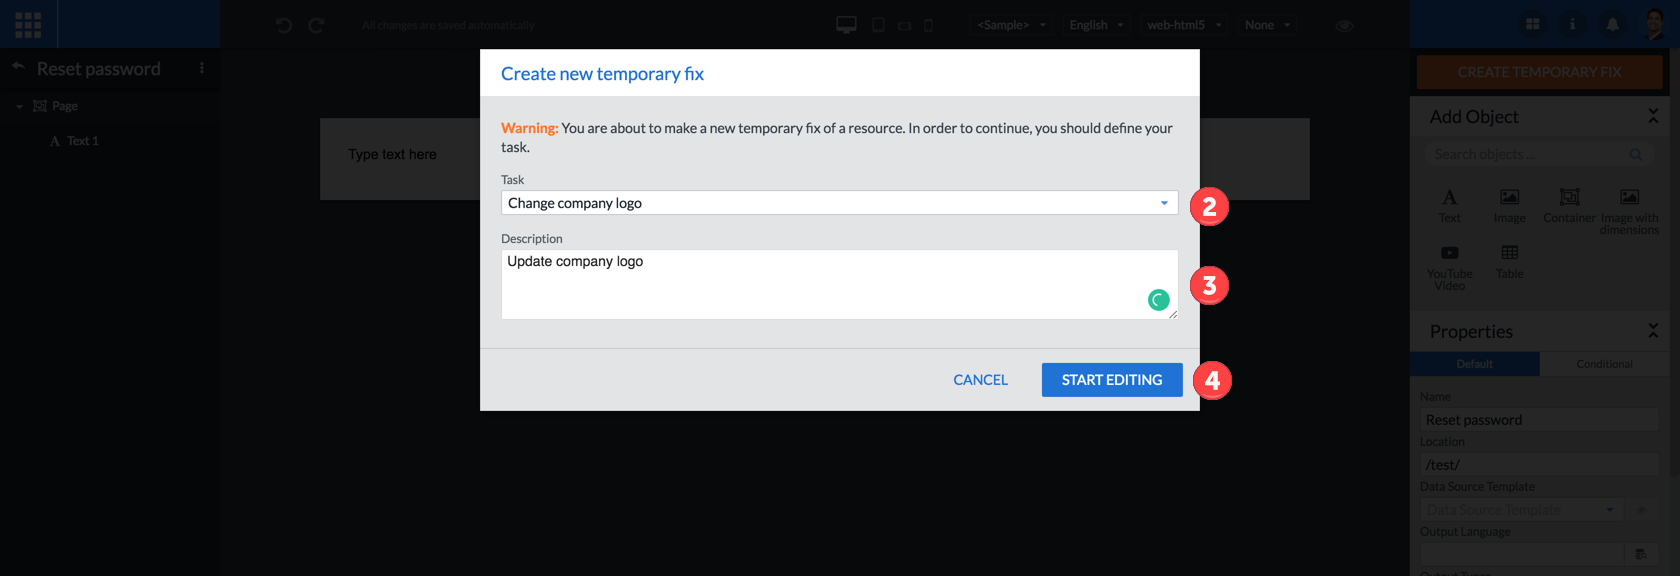
| 1 | Click the CREATE TEMPORARY FIX Button |
| 2 | Choose an existing task or type the name for a new one |
| 3 | Optional: Edit the description |
| 4 | Click START EDITING |