LiveDocs User Guide
- 1. Installation
- 2. Concepts
- 3. Tasks
- 3.1. Build Document
- 3.2. Compare Live Document Instances
- 3.3. Administration
- 3.3.1. Manage Data Source Templates
- 3.3.2. Manage Live Blocks
- 3.3.3. Edit Live Block
- 3.3.4. Manage Live Documentation Definitions
- 3.3.5. Edit Live Document Definition
- 3.3.6. Manage meta data
- 3.3.7. Configuration
- 3.3.8. Integration
- 3.3.9. Manage actions
- 3.3.10. LiveDocs Permissions
- 3.3.11. Rest-API permissions
- 3.4. Manage languages
- 4. Reference
- 5. Upgrade Information
This documentation describes the Scriptura Engage LiveDocs component.
1. Installation
First, make sure Scriptura Engage is installed. See Installation and Activation.
1.1. Install the eXist database
LiveDocs uses an XML database to cache resources, namely eXist. The reference version is 2.0-rev18252. It is available for download at http://sourceforge.net/projects/exist/files/Stable/2.0/ The recommended value for the maximum memory option is 2048 MB.
1.2. Install plug-ins
To add the LiveDocs plug-ins to Scriptura Engage, you need to use the Deployment Console. Open a command prompt or shell, go to the deploymentconsole directory of the Scriptura installation and execute the following command:
ScripturaDeploymentConsole -package [location]\scriptura-livedocs-update-site-release-[version].zip
E.g.: ScripturaDeploymentConsole -package D:\installer\scriptura-livedocs-update-site-release-1.0.0-20141217.140609-12.zip
1.3. Deploy Document Flows (optional)
LiveDocs uses web services for generating previews and for generating the final output. A default implementation is provided in the form of a Scriptura Project with a set of Document Flows. Deploy them by placing the file scriptura-livedocs-scriptura-project-release-[version].zip in the deploy-directory of the Scriptura home directory and then starting the Process Server.
1.4. Restore XYZ-demo (optional)
A sample set of LiveDocs resources is provided. Together with the Document Flows from the previous step, they can be used to explore LiveDocs. Extract the file backups/xyz-demo.zip from scriptura-livedocs-scriptura-project-release-[version].zip and restore this backup in a workspace of the Scriptura Web Interface}.
2. Concepts
The following basic concepts are used in LiveDocs.
2.1. Terms
-
Live Block: This denotes the basic building block of LiveDocs. Most of the time, this corresponds to one paragraph.
-
Live Document Definition: This describes how a certain document type is built up. It consists of Live Blocks.
-
Meta data: This is a user-defined field for either Live Blocks or Live Document Definitions.
-
Section: A part of the Live Document Definition that corresponds to one area in the output document.
-
Live Template: A Scriptura Template used by a Live Document Definition to define the layout of the document. It has a placeholder for each Section in a Live Document Definition.
-
Live Document Instance: This is an instance of a Live Document Definition. It represents an actual communication.
-
UI language: The language that is used for the User Interface.
-
Destination language: The language that is used for the Live Document Instance.
-
Data Source Template: A description for a hierarchical data source that specifies which data is available to a block or document.
3. Tasks
3.1. Build Document
This section describes how to build a Live Document Instance with LiveDocs. When LiveDocs is running in standalone mode, you can start building a document from the home screen. Otherwise, this screen is opened by an external application. See Configuration for changing the mode.
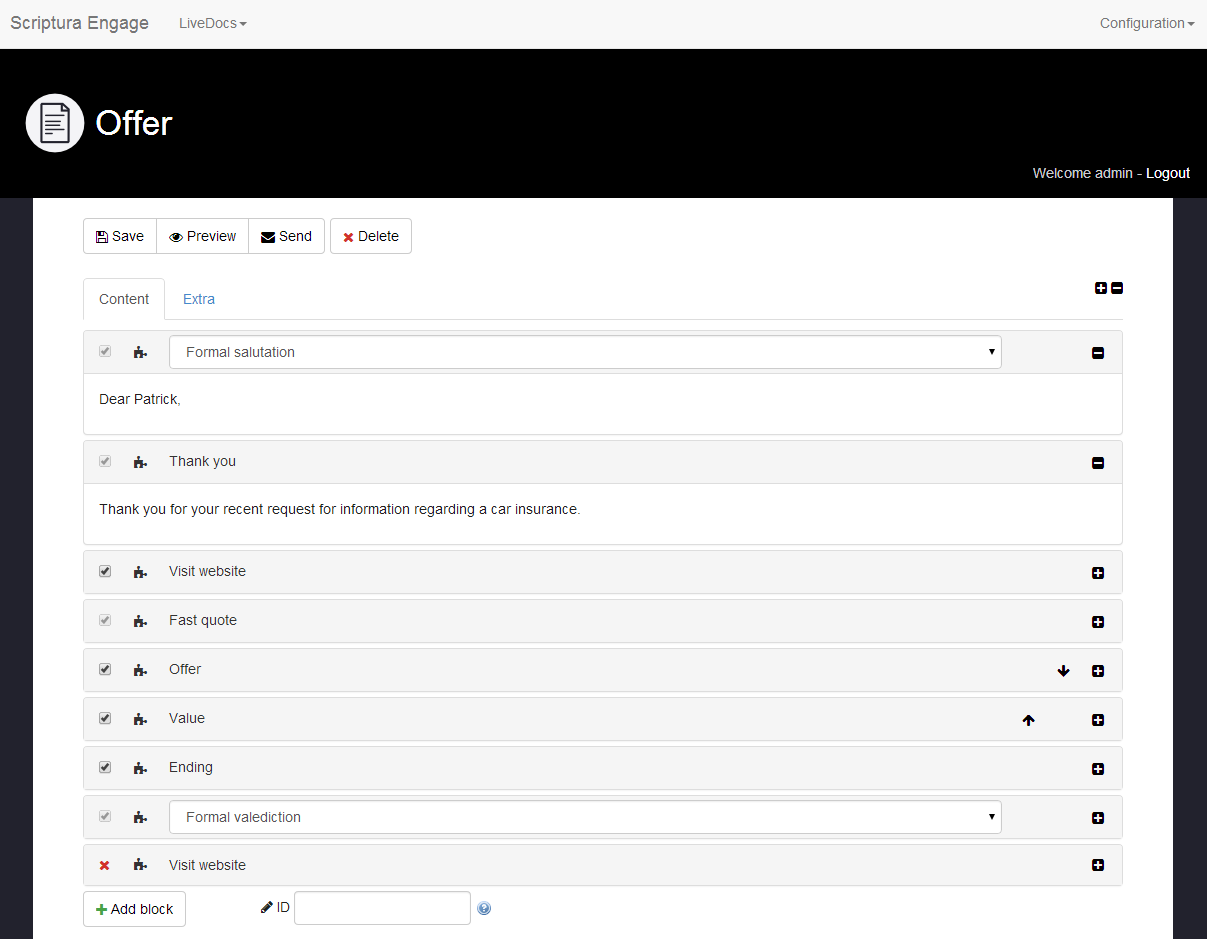
3.1.1. Actions
-
Save: Save a draft of the current document. You can continue working on the document later, by selecting it on the Saved documents screen.
-
Preview: Show a preview of the actual document. By default, the preview is displayed in a popup-window. See Configuration for displaying the preview on the right.
-
Send: Submit the document for generation. This document will no longer appear as a draft and it is no longer possible to make changes.
-
Delete: Delete the draft of this document.
3.1.2. Sections
A section corresponds to one dynamic area in the output document. Each section is a placeholder for Live Blocks. If there is more than one section in the document, tabs will be displayed, which allow you to switch between sections.
3.1.3. Live blocks
All predefined blocks are displayed. You can still change the following (if allowed by the Live Document Definition).
-
Select/Deselect: If a block is not mandatory, you can select or deselect a block.
-
Choose alternative: If more than one Live Block is available for a given position, you will be able to choose from the alternatives.
-
Move up/down: If the position of a block is not fixed, you can move it.
-
Expand/Collapse: You can show or hide the contents of a block. Use the icons at the top to expand/collapse all blocks at once
-
Delete: If a block was added manually, you can remove it again.
-
Edit: If a block is editable, you can change the contents and its styling.
3.1.4. Add block
If the Live Document Definition allows you to add blocks, you can search for extra blocks and add them to the end of the document. Added blocks never have a fixed position and can be removed again. If you selected a meta data field for quick entry, it will appear next to the button. When you enter a value and press enter, the Live Block will be added directly (provided there is exactly one match).
3.1.5. Saved documents
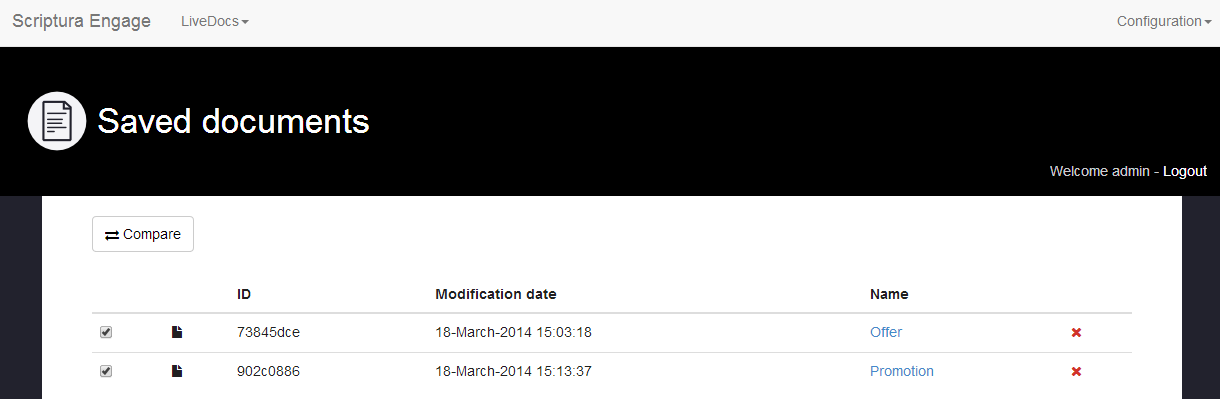
Saved documents can be found on the Saved documents screen. You can get there by using the Saved documents link on the home screen. You can continue working on any document by clicking on its name. When a document is finally sent, it will no longer appear on the Saved documents screen. You can compare Live Document Instances by selecting two instances and clicking Compare. See Compare Live Document Instances.
3.2. Compare Live Document Instances
This section describes the comparison of Live Document Instances.
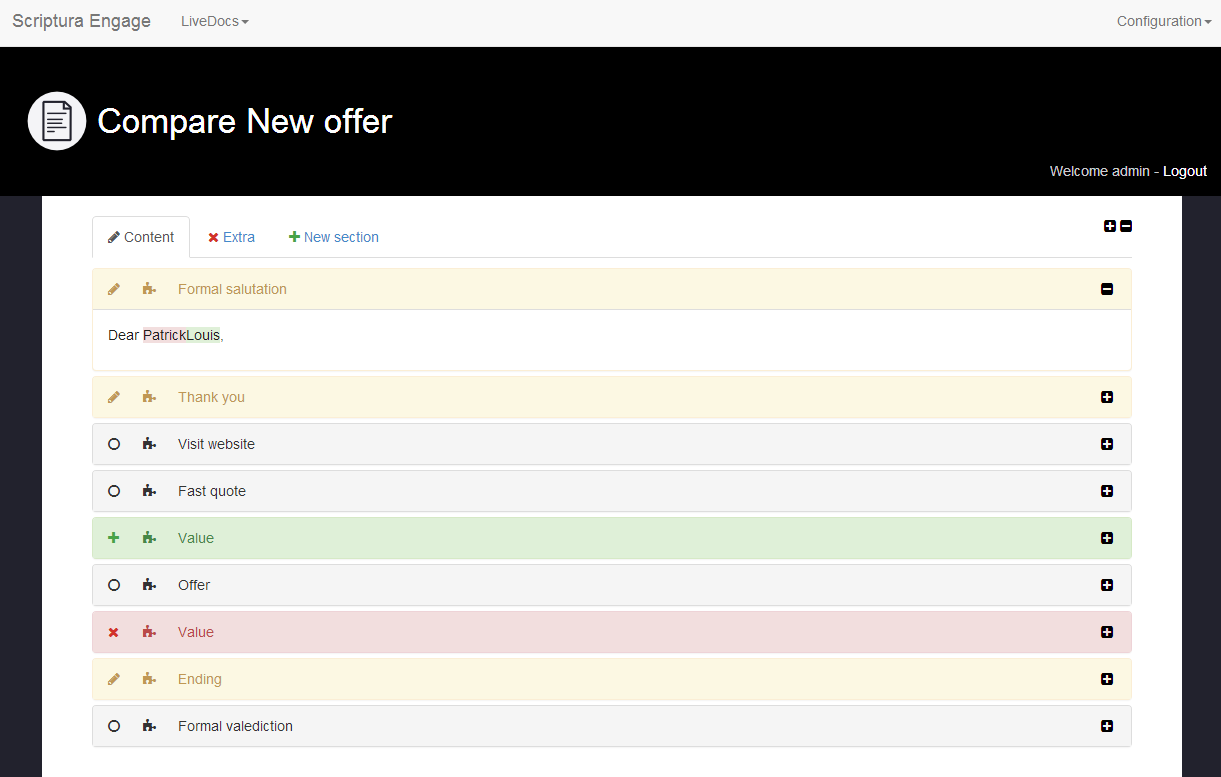
3.2.1. Compare
All sections and all blocks from both instances are displayed. Different color codes and icons are used to indicate the changes between the instances.
-
 Changed: A section or a block that is present in both instances, but with different content. In case of a block, the differences are highlighted.
 -
 Removed: A section or a block that is present in the first instance, but not in the second.
 -
 Added: A section or a block that is only present in the second instance.
 -
 Unchanged: A section or a block that is exactly the same in both instances.
3.3. Administration
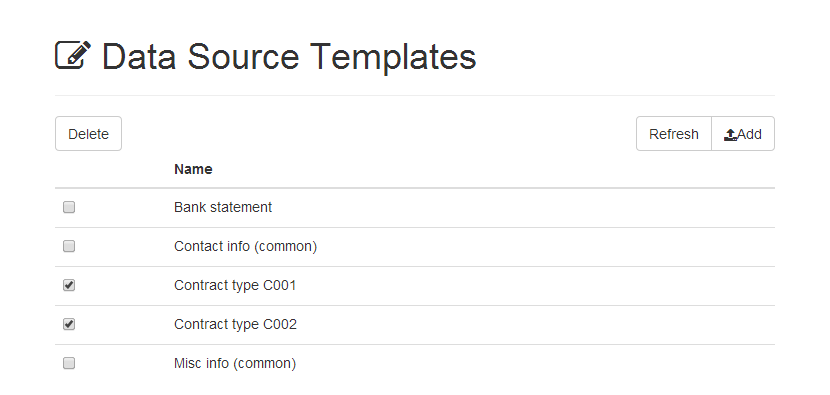
3.3.1. Manage Data Source Templates
This section describes how to add and remove Data Source Templates.
The Manage screen lists all registered Data Source Template by name. The registered Data Source Templates are available in LiveBlocks via the Data Source attribute.
Manage
To add a Data Source Template, click the Add button in the top right corner: The Data Source Template dialog is shown. Specify a unique name for the Data Source Template. Next select and upload an XML file that serves as sample for the structure of the template. Finally, click Add. The new Data Source Template will be shown in the list.
To delete one or more Data Source Templates, use the check buttons on the left of each Data Source Template in the list, and click the Delete button in the top left corner.
3.3.2. Manage Live Blocks
This section describes how to create and update Live Blocks.
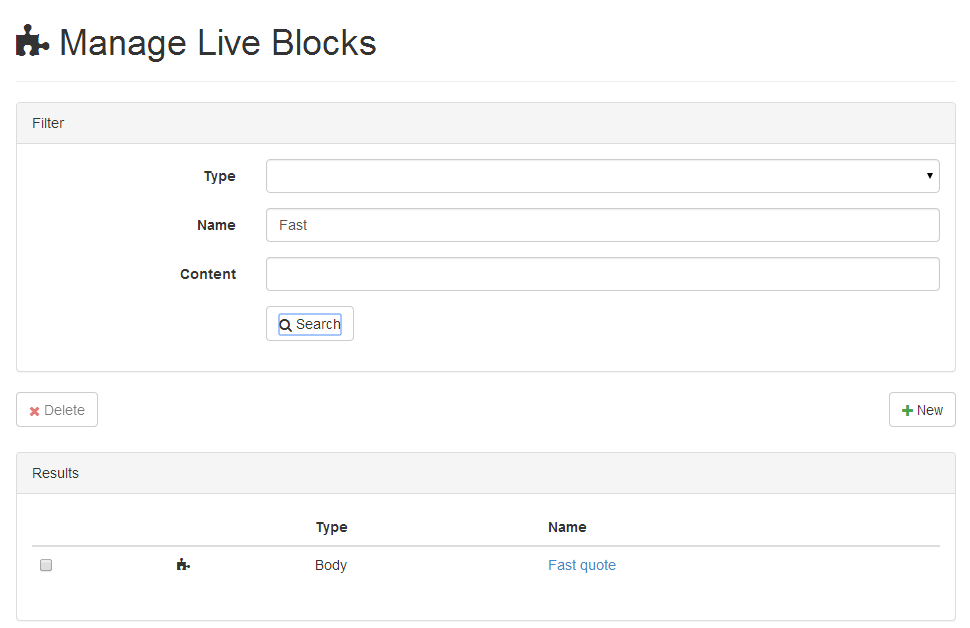
Create new Live Block
You can create new Live Blocks by clicking New, providing all data and selecting Save.
Search existing Live Block
Search for an existing Live Block by entering one or more values of Meta data fields and selecting Search. Click on the name of a Live Block to edit it.
When using a search term for a Meta data field that contains separators such as a space or dash the search will look for blocks that have any of the parts as value. To perform a literal search with such a term it has to be surrounded by quotes.
An example of such a term is: content type, this will return all blocks that have content or type as value for the Meta data field. Using "content type" instead, will return all blocks that have content type as value for the Meta data field.
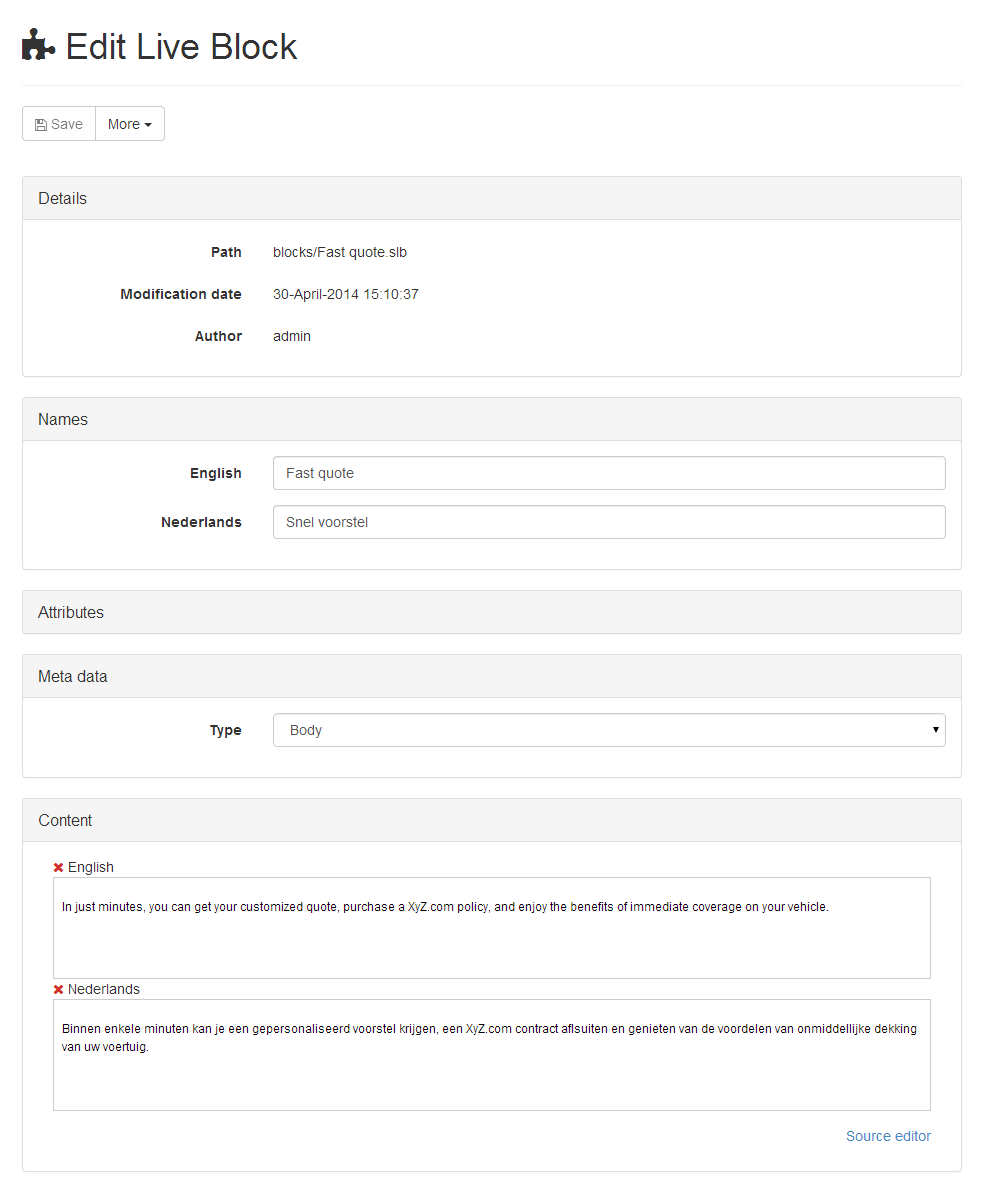
3.3.3. Edit Live Block
View dependent documents
You can view the list of documents that depend on the Live Block that is currently open by first clicking on More and then selecting Dependent Documents. This will open a list of documents that are currently using the Live Block. You can open the document by clicking on its name.
Save copy
You save the Live Block that is currently being edited as a new Live Block by first clicking on More and then selecting Save copy. This will create a new Live Block with the contents from the editor. The original Live Block that was opened, will not be modified.
Delete existing Live Block
You can delete the Live Block that is currently being edited by first clicking on More and then selecting Delete. This will remove the Live Block from the system. If the Live Block is still being used in one or more documents, you will be notified.
Edit Live Block
-
Details: Some general properties of a Live Block are displayed here.
-
Names: This is the name of the Live Block, which is displayed in search results etc. in the language of the UI.
Data fields are supported in the name of a Block. See Data fields below. -
Attributes:
-
Reusable object: Indicate if the contents of a Scriptura Reusable Object should be used.
-
Reusable object path: The path to the Scriptura Reusable Object (only available when Reusable object is selected).
-
Editable: Indicate if a Live Block is editable when it is used in a Document Instance (only available when Reusable object is not selected).
-
Data Source: Select the Data Source Template that should be used to insert data fields. (only available when Reusable object is not selected).
-
-
Meta data: A value can be entered for each Meta data field.
-
Content: The actual content can be entered here (only available when Reusable object is not selected).
There is a different version for every supported destination language. Two editing modes are available:-
Rich-text: This is the default mode. It uses a rich-text WYSIWYG-editor to enter the contents.
-
Source: This is the advanced mode. It allows to enter the source HTML, which gives more control over the actual output.
It also allows the usage of conditions and repeats in more places than with the rich-text editor (e.g. a repeat on a table row:<table>{repeat:entry}<tr><td>{data:.}</td></tr>{repeat}</table>).
When using the source mode, make sure the HTML that is used in the Document Instance (see Building Documents) is valid (e.g.: there should be no text between the table-element and the tr-element). Either do this by making the Live Block read-only, or by configuring that repeats and conditions should be resolved (see resolve-level in Configuration).
-
Spelling
When working with the rich-text WYSIWYG-editor you can perform a spelling check.
-
Do a spelling check: To perform a spelling check, click on the Spelling Button
 button in the toolbar of the rich text editor.
All spelling problems found in the text of the rich text editor are marked with a red line. You can fix the problems by clicking on the problematic words, a list with suggestion will be provided. -
Change spelling language: To change the spelling language, click on the little arrow next to the Spelling Button
button in the toolbar of the rich text editor.
Choose the new language to use.
By default the language of the block you are editing will be used if available.
Data fields
You can use dynamic data in the contents of a Live Block. Queries are executed on the input data XML document.
-
Data field: To insert a data field, click the Insert Data Field
 button in the toolbar of the Live Block rich text editor.
The Data Field dialog is shown: It shows the hierarchical data structure of the data source (based upon the Data Source Template selected in the Data Source attribute of the block - see above). Additionally, sample values are shown next to the data field names.
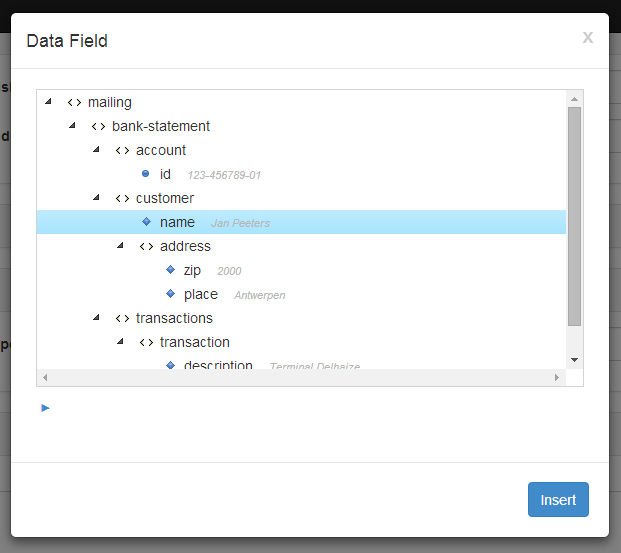
Next, select the field to be inserted.
The dialog also has an advanced editor (click the triangle) in which the generated XPath query can be further refined or an XPath query can be constructed from scratch.
When a Data Field is selected, or an XPath query entered in the advanced view, click Insert.
A Data Field icon represeting the data field, is inserted at the cursor position. To edit the data field, double click the data field icon. To delete the data field, simply delete the icon as any character in the editor.
-
Data field in Source editor:
{data:name}.
This construct outputs the result of the XPath-query (in this case name). -
Condition:
{if:amount='100'}text{if}.
This construct only outputs the contents (in this case text) if the result of the XPath-query (in this case amount='100') evaluates to true().
Optionally, it can output different content if the condition evaluates to false().
{if:gender='male'}Mr.{else}Ms.{if} -
Repeat:
{repeat:product}text{repeat}.
This construct repeats the contents (in this case text) for each item in the result-sequence of the XPath-query (in this case product). -
Input field:
{input:department:Department}.
This construct adds an input field (unless the block is editable). When building a Live Document Instance, an input field will be added.
The first parameter is a reference to the XML node. This is an XPath expression. If it consists of a simple sequence of element names (e.g.: element1/element2), extra elements are added to the Data Source to make sure the XML node exists. If it contains more complex constructs like predicates or attributes (e.g.: element[value='foo']/@attr), this will not happen.
The second parameter is the label of the input field.
Datafields are allowed in the label also.
E.g.:{input:department:Department of {data:company}}.
For the XML:<data><company/><department/></data>
If the input data XML document already contains a value for the given XML node, it will be used as default value for the input field. The final value is included in the XML document, and can be used in Document Flow.
XPath 2.0 queries are supported.
The position() and the last()-function are also supported relative to a repeat.
E.g.: {repeat:product}{data:.}{if:position()<last()}, {if}{repeat}
For the XML: <data><product>Item1</product><product>Item2</product></data>, this will output Item1, Item2
3.3.4. Manage Live Documentation Definitions
This section describes how to create and update Live Document Definitions.
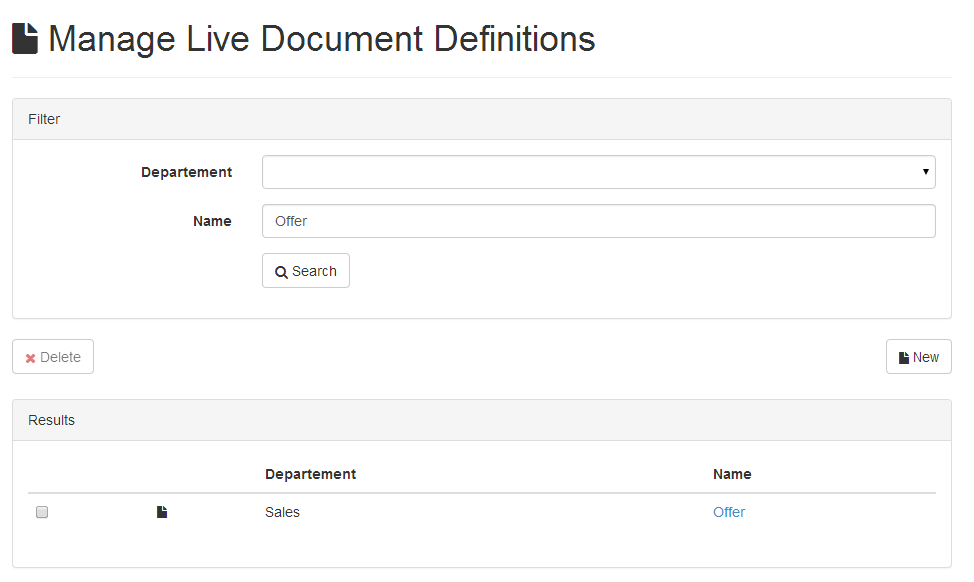
Create new Live Document Definition
You can create new Live Document Definitions by clicking New, providing all data and selecting Save.
3.3.5. Edit Live Document Definition
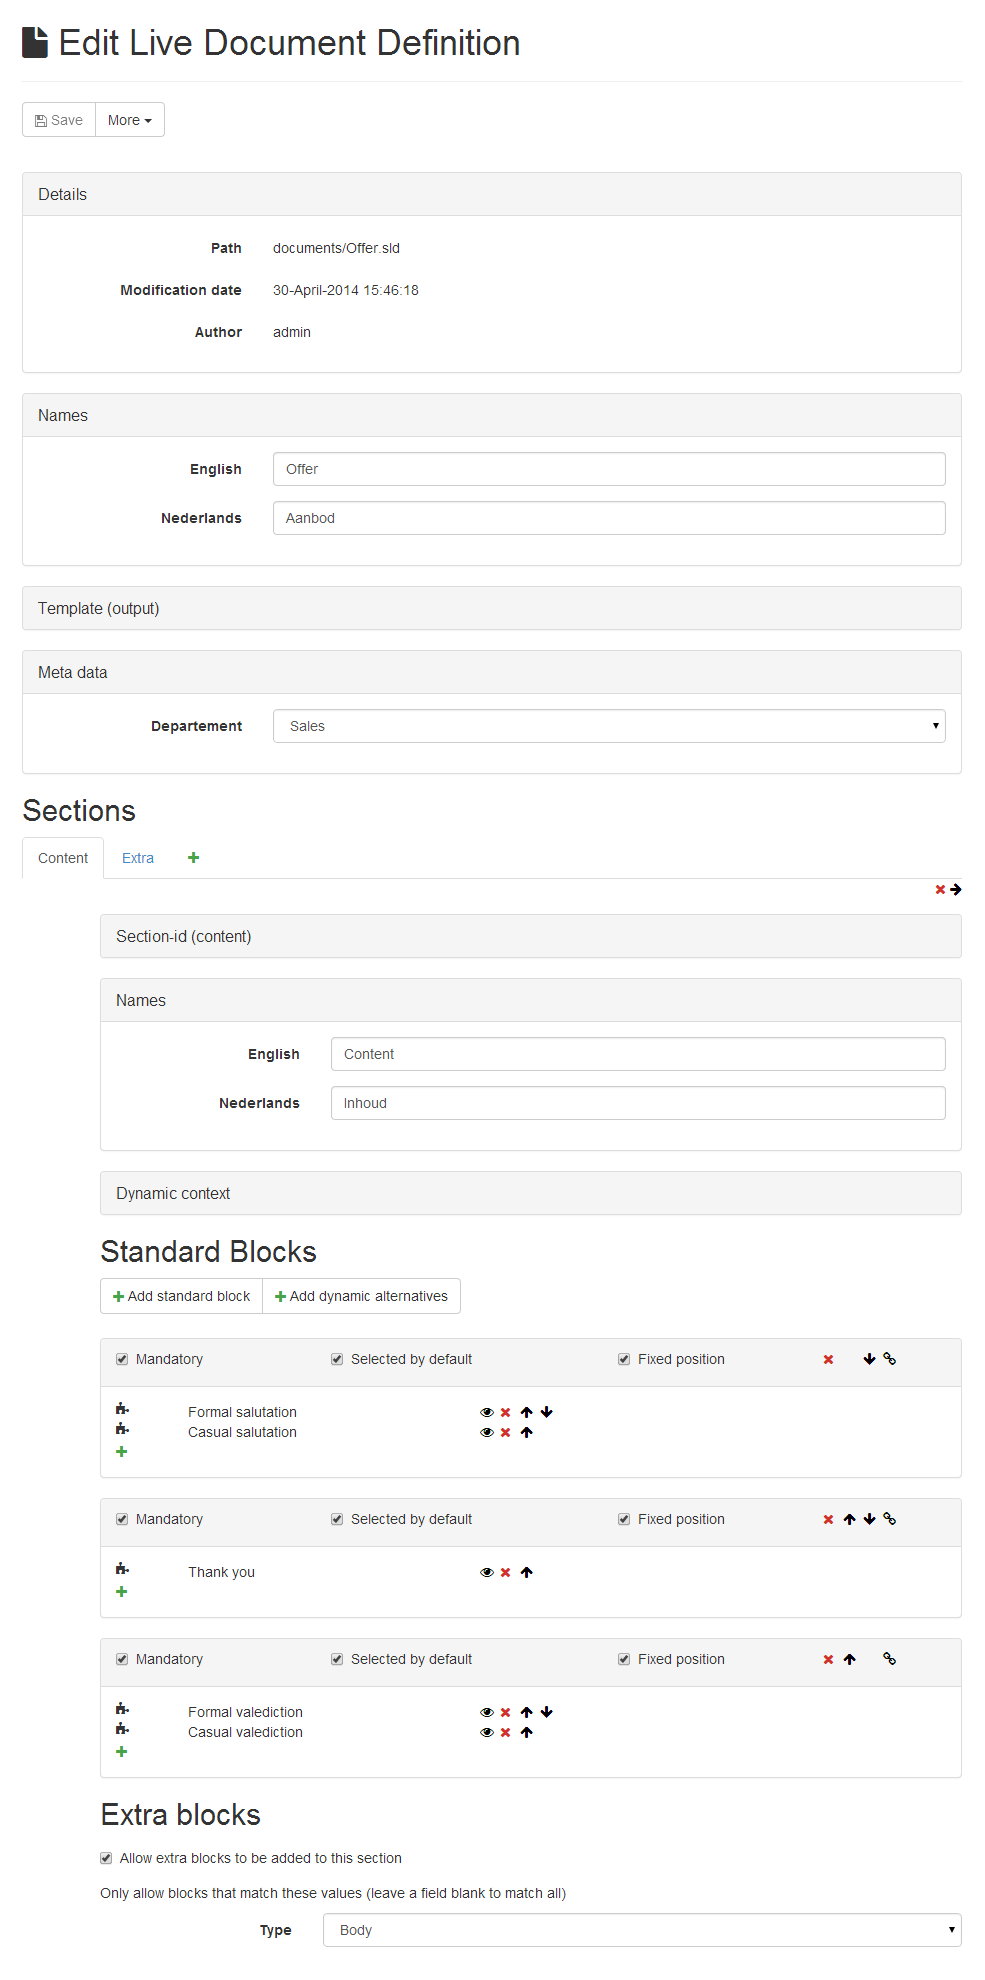
Save copy
You save the Live Document Definition that is currently being edited as a new Live Document Definition by first clicking on More and then selecting Save copy. This will create a new Live Document Definition with the contents from the editor. The original Live Document Definition that was opened, will not be modified.
Delete existing Live Document Definition
You can delete the Live Document Definition that is currently being edited by first clicking on More and then selecting Delete. This will remove the Live Document Definition from the system.
Edit Live Document Definition
-
Details: Some general properties of a Live Document Definition are displayed here.
-
Names: This is the name of the Live Document Definition, which is displayed in search results etc. in the language of the UI.
Data fields are supported in the name of a Live Document Definition. See Data fields. -
Template: Indicate which Scriptura Template should be used to generate output. This ID is mapped to the path of a Scriptura Template (.scd) in Document Flow.
-
Meta data: A value can be entered for each Meta data field.
-
Sections: A section corresponds to one dynamic area in the output document. Each section is a placeholder for Live Blocks.
-
Section-id: The internal ID of this section. It is used to determine which area it should replace in the Scriptura Template.
Data fields are supported in the ID of a section. See Data fields. -
Names: This is the name of the section, which is displayed as a label on a tab (when there is more than one section).
Data fields are supported in the name of a section. See Data fields. -
Dynamic context: Properties with regard to conditions and repeats on sections are displayed here.
-
Repeat: The section will be repeated for every item in the result-sequence of this XPath-expression. All dynamic content (like the section’s name and datafields in Blocks) will be relative to this repeat.
-
-
Blocks: The following defines which blocks are available in a section and how they behave.
-
Blocks
The following configurations and properties are available
-
Standard blocks: This is the default way of including Live Blocks. It simply inserts a Live Block at a certain position. If more than one Live Block is added at a certain position, they become alternatives. Only one Live Block can be included in the output, and the list will be displayed as a dropdown.
-
Dynamic alternatives: This also inserts one Live Block at a certain position, but the alternatives are not listed explicitely. Instead, a filter on meta data fields will define which Live Blocks will be displayed in the dropdown.
-
Mandatory: If a set of alternative Live Blocks is mandatory, it won’t be possible to omit it.
-
Selected by default: If mandatory is not selected, this property indicates if this set of alternative Live Blocks will be included by default.
-
Fixed position: When selected, the position of the block cannot be changed in the output. Fixed blocks impose a boundary. Adjacent moveable blocks cannot switch position with it.
-
Dependency: When clicking the dependency-icon, a dialog appears. The current block will only appear if at least one of the selected blocks is included in the output. Select none to indicate that there is no dependency.
-
Details: Click the details-icon to preview the contents of a block, to change the condition, or to edit the block.
-
Move up/down: The position of a set of Live Blocks can be changed, as well as the alternatives within a set.
-
Delete: An entire set of Live Blocks can be deleted, as well as the alternatives within a set.
3.3.6. Manage meta data
This section describes how to add meta data for Live Blocks or Live Document Definitions.
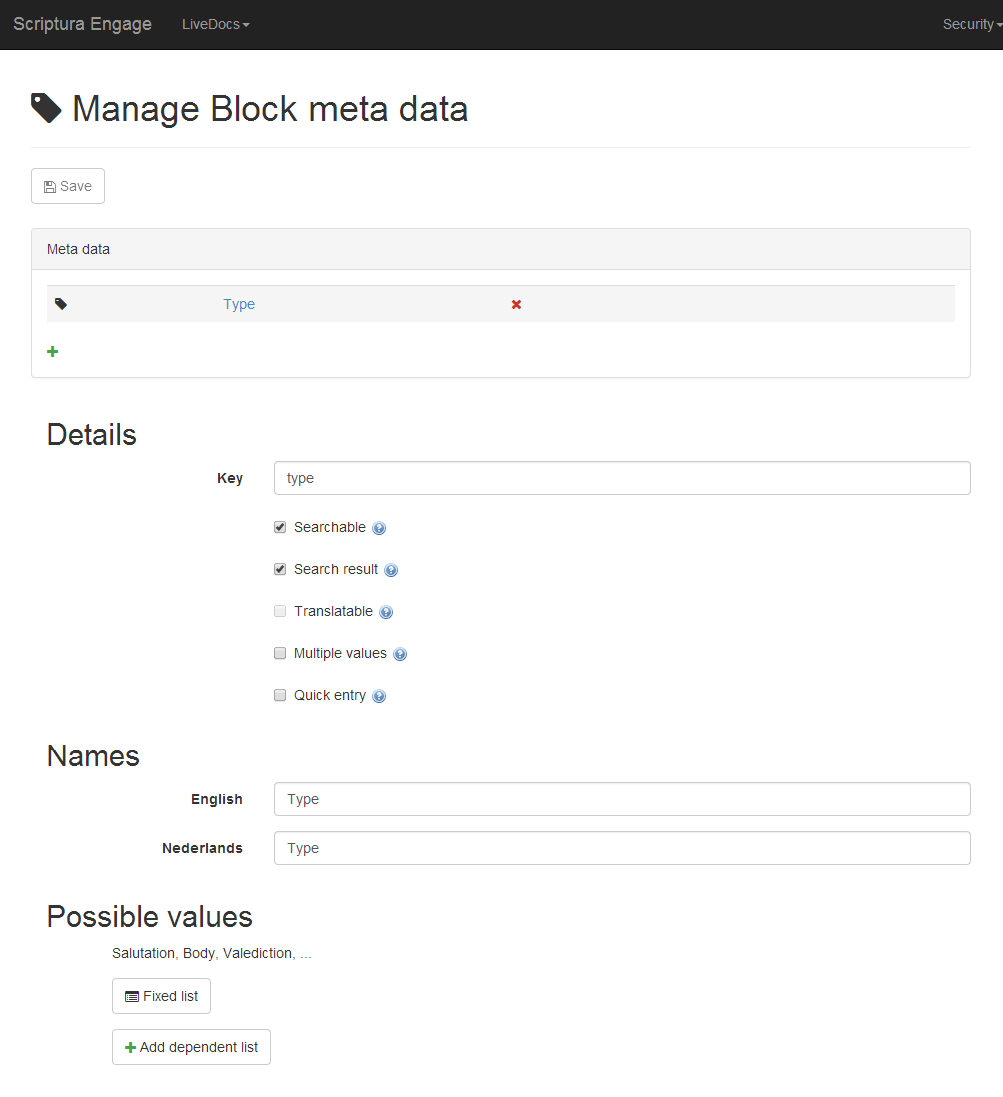
Manage
You can create a new meta data field by clicking Manage Block meta data / Manage Document meta data.
Click the Add meta data field button and provide the data:
-
Details: some general properties of a meta data field can be provided here.
-
Key: this an internal ID of the field.
-
Searchable: a flag indicating whether or not this field can be used as a search filter.
-
Search result: a flag indicating whether or not this field will appear as a column in the search results table.
-
Translatable: (only enabled when no fixed values are defined) a flag indicating whether a different value can be given to the field for each UI language.
-
Multiple values: a flag indicating whether multiple values can be selected.
-
Quick entry (Live Blocks only): a flag indicating that this field will be available for quick blocks search when editing Live Document instance. See also Building documents.
-
-
Names: this is the name of the meta data field, which is displayed in search results etc. in the language of the UI.
-
Possible values:
-
The predefined list of possible values of the meta data field can be specified here. Click the Fixed list button to provide the values.
-
Alternatively, the field can have free-text values, i.e. any text value is accepted. Besides, the values can also be provided in all available UI languages if Translatable property is checked.
-
Adding possible values
-
Value: the value.
-
Names: the name of the value which is displayed in the drop down menu to choose from in the language of the UI.
The order in which the values appear in the drop down menus, lists etc. can be modified by up and down-buttons. The values can be added/deleted by clicking on the Add/Delete buttons.
Using the meta data
Now the new meta data field can be used as a filter in the search screens.
The new meta data field is added to the Meta data part of a Live Block / Live Document Definition.
If a block / document definition was created before the meta data field has been added, the value of that field will be empty for such block / document definition.
3.3.7. Configuration
-
/config/server/livedocs/cache-instances: true/false. When disabled, Live Document Instances will not be cached in the eXist database. It will reduce the number of documents in the eXist database and improve its performance. When there are a lot of Live Document Instances, setting this option to false will improve the performance of eXist (because there are fewer documents in eXist). Warning: Searching for Live Document Instances will no longer be possible, either in the User Interface, or through the Web API. Other functions, such as generating output or deleting Live Document Instances, are not affected by this option. The default value is true.
-
/config/server/livedocs/cache-size-merged-resources: The maximum number of cache entries that is kept in memory for each workspace and for each set of resources (e.g. languages, Live Block Meta Data, Live Document Definition Meta Data). The result of merging the set of resources is kept in the cache. The sets of resources are kept in another cache, which is controlled by /config/server/livedocs/cache-size-user-resource-queries.
-
/config/server/livedocs/cache-size-user-resource-queries: The maximum number of cache entries that is kept in memory for each workspace and for each resource type (e.g. languages, Live Block Meta Data, Live Document Definition Meta Data). In some places, resources need to be merged (e.g. in the Live Block search screen all Live Block meta data fields should be displayed). Not every user is allowed to read the same resources. This depends on the privileges of the user. This cache remembers the search result for the given number of users. The merged results are kept in another cache, whose size can be configured with config option /config/server/livedocs/cache-size-merged-resources. The workspace cache is configured with /config/server/livedocs/cache-size-workspaces.
-
/config/server/livedocs/cache-size-workspaces: The number of workspaces for which a cache is kept in memory. Things like search results and merged resources (which are controlled by /config/server/livedocs/cache-size-user-resource-queries and /config/server/livedocs/cache-size-merged-resources) are kept in this cache.
-
/config/server/livedocs/default-expanded: true/false. When disabled, blocks will be collapsed by default when creating a new document. The default value is true.
-
/config/server/livedocs/editable-block/resolve-level: datafield/condition/repeat/none. This option indicates what logical constructs should be resolved for editable Live Blocks, when building a Live Document Instance. The default value is datafield.
-
datafield: Data fields are resolved, and all of the below (note that input fields will always result in unresolved data fields).
-
condition: Conditions are resolved, and all of the below.
-
repeat: Only repeats are resolved.
-
none: Nothing is resolved (only input fields are converted to data fields).
-
-
/config/server/livedocs/exist/collection: The base-collection for LiveDocs. The default value is /db/apps/livedocs.
-
/config/server/livedocs/exist/host: The host of the eXist database. The default value is localhost.
-
/config/server/livedocs/exist/password: The password to be used to access the eXist database. The default value is admin.
-
/config/server/livedocs/exist/port: The port of the eXist database. The default value is 8080.
-
/config/server/livedocs/exist/system: The location of the system-collection. The default value is /db/system/config.
-
/config/server/livedocs/exist/username: The username to be used to access the eXist database. The default value is admin.
-
/config/server/livedocs/external/url: The full URL of the Scriptura Process Server that runs the preview and send Document Flows. The default value is http://localhost:13542. This config option replaces the previous (deprecated) external host and port config options.
-
/config/server/livedocs/external/host (deprecated): The host of the Scriptura Process Server that runs the preview and send Document Flows. The default value is localhost.
-
/config/server/livedocs/external/port (deprecated): The port of the Scriptura Process Server that runs the preview and send Document Flows. The default value is 13542.
-
/config/server/livedocs/message-domain: The domain which runs your JavaScript code that is accessing LiveDocs JavaScript API. The default value is http://localhost:13342. Multiple values may be specified by separating them with a comma.
-
/config/server/livedocs/preview-mode: popup/split-right. In case of popup, the document preview is displayed in a new windows. In case of split-right, the screen is split and the preview is displayed on the right. The default value is popup. This option can be overridden on a page by specifying request parameter preview-mode.
-
/config/server/livedocs/resource-server/sync-cron: The cron-expression for synchronizing the LiveDocs resource cache. The default value is '0 0 * * * ?' (each hour). When this option is set, the previous (deprecated) option is ignored.
-
/config/server/livedocs/resource-server/sync-interval (deprecated): The interval (in seconds) at which the LiveDocs resource cache will be synchronized with the resource server. The default value is 1 hour.
-
/config/server/livedocs/save-enable: true/false. When enabled, Live Document Instances can be saved. This allows you to continue working on a document at a later time. The saved instances of the current user are displayed on the home screen. The default value is true.
-
/config/server/livedocs/section/display: tabs/vertical. Indicates how sections should be displayed when building a Live Document Instance. The default value is tabs.
-
tabs: Sections are displayed as tabs. Only one section is visible at a time.
-
vertical: Sections are displayed one after the other. All sections are visible. This option can be overridden on a page by specifying request parameter section-display.
-
-
/config/server/livedocs/show-buttons: true/false. When disabled, the toolbar at the top will not be displayed. This is useful for embedding LiveDocs in another application, which triggers the actions. The default value is true. This option can be overridden on a page by specifying request parameter show-buttons.
-
/config/server/livedocs/standalone: true/false. When disabled, no header will be displayed and the flow is more suited for embedding in an existing application. The default value is true. This option can be overridden on a page by specifying request parameter standalone.
3.3.8. Integration
This section explains how LiveDocs can be integrated in an existing system.
Search Document Definition
When LiveDocs is running in standalone mode, you start from the home screen. By default, this screen is available at http://localhost:13342/forms/livedocs/. Under "Search Live Document", you can simulate a calling application. Select the destination language and a datasource and click "Go".
When integrating LiveDocs in another system, you want to display the search-page directly. The default location is http://localhost:13342/forms/livedocs/search-document?datasource=sample.xml&dest-lang=en.
Request parameters
-
datasource: The path of the datasource.
-
dest-lang: The code of the language that should be used to generate the Live Document Instance.
-
ui-lang (optional): The code of the language that should be used in the user interface. If it is not provided, the last used language is taken, or the first defined UI-language.
-
meta-<key> (optional): This parameter can be used to prefill some or all of the meta data filters. <key> is the key of the meta data field. Repeat this parameter for every meta data field that you want to prefill. A search will be performed automatically.
-
continue (optional): true/false. This parameter is only applicable if the previous parameter is also specified. In case there is only one search result, that document will automatically be selected.
Datasource
The datasource is used to pass XML data from the calling application to LiveDocs. The XPath queries of the data fields in Live Blocks are executed on this XML.
To send the datasource, you can use the Datasource web API. This provides a webservice that accepts the datasource and responds with the ID that was generated to identify this datasource.
3.3.9. Manage actions
This section describes how to customize the Preview and Send-actions of the Build Document-screen.
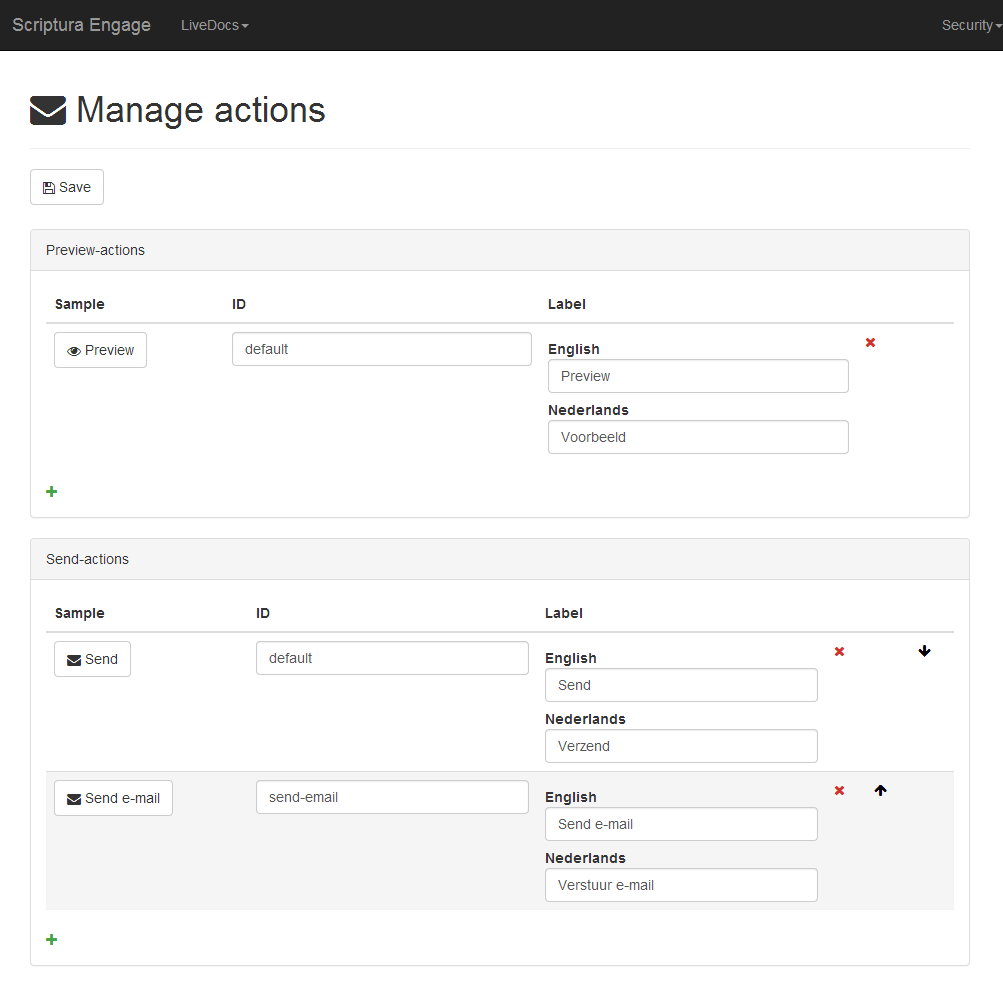
Manage
-
Sample: This column shows a preview of the button, as it will appear in the Build Document-screen.
-
ID: The string that will be sent to the document. Use this value to select different paths in the Document Flow. It will be passed as a request-parameter to the Preview Document Flow, and it will be set in the attribute action-id of the instance that is made available to the Output Document Flow.
-
Label: The label of the button. You can provide a different label for each UI-language.
-
Move up/down: The position of an action can be changed.
-
Delete: Removes an action.
3.3.10. LiveDocs Permissions
This section describes the user permissions available in LiveDocs.
The LiveDocs permissions are assigned to a user according to the standard procedure. See Security section.
This section also describes the required access rules to properly use LiveDocs as a particular user. Access rules will grant or deny access to the various resources used within the application. The following lists will use the default folders for the different types of LiveDocs resources. These can be changed by specifying different folders in the 'Application Settings' page. These have to be taken into account. The access rules will be described as follows: Access | Resource | Operations. For example: allow | 'idr://default-store/default-workspace/foo' | read. For more information regarding access rules see Access Rules section.
Block Manager
-
Required permissions:
-
livedocs:ui:block-definitions:manage
-
-
Required access rules:
-
Blocks: allow | 'idr://{store name}/{workspace name}/blocks/**' | read, write
This access rule can be modified to allow access to a more specific set of Live Blocks. -
Configuration: allow | 'idr://{store name}/{workspace name}/resources/**' | read
-
Data Source Templates: allow | 'idr://{store name}/{workspace name}/data-source-templates/**' | read
-
Document Definition Manager
-
Required permissions:
-
livedocs:ui:document-definitions:manage
-
-
Required access rules:
-
Blocks: allow | 'idr://{store name}/{workspace name}/blocks/**' | read
This access rule can be modified to allow access to a more specific set of Live Blocks. -
Document Definitions: allow | 'idr://{store name}/{workspace name}/documents/**' | read, write
This access rule can be modified to allow access to a more specific set of Live Document Definitions. -
Configuration: allow | 'idr://{store name}/{workspace name}/resources/**' | read
-
Data Source Templates: allow | 'idr://{store name}/{workspace name}/data-source-templates/**' | read
-
Document Instance Manager
-
Required permissions:
-
livedocs:ui:document-instances:manage
-
livedocs:rest-api:datasources:manage
-
-
Required access rules:
-
Blocks: allow | 'idr://{store name}/{workspace name}/blocks/**' | read This access rule can be modified to allow access to a more specific set of Live Blocks.
-
Document Definitions: allow | 'idr://{store name}/{workspace name}/documents/**' | read
This access rule can be modified to allow access to a more specific set of Live Document Definitions. -
Configuration: allow | 'idr://{store name}/{workspace name}/resources/**' | read
-
Live Document Instances: allow | 'idr://{store name}/{workspace name}/instances/**' | read, write
This access rule can be modified to allow access to a more specific set of Live Document Instances. -
Data Sources: allow | 'idr://{store name}/{workspace name}/data/**' | read
-
Data Source Templates: allow | 'idr://{store name}/{workspace name}/data-source-templates/**' | read
-
A list of the permissions and the pages they allow access to
-
livedocs:ui:block-definitions:manage
-
Manage Live Blocks
-
-
livedocs:ui:document-definitions:manage
-
Manage Live Document Definitions
-
-
livedocs:ui:document-instances:manage
-
Saved Documents
-
Search Live Documents
-
Building Documents
-
-
livedocs:ui:cache:clear
-
Clear cache
-
-
livedocs:ui:actions:manage
-
Manage actions
-
-
livedocs:ui:block-metadata:manage
-
Manage Block meta data
-
-
livedocs:ui:document-metadata:manage
-
Manage Document meta data
-
-
livedocs:ui:languages:manage
-
Manage languages
-
-
livedocs:ui:backups:manage
-
Restore backup form on the Start LiveDocs page
-
-
settings:application:manage
-
Manage Application Settings
-
-
datasourcetemplate:manage
-
Data Source Templates
-
3.4. Manage languages
This section describes how to configure custom languages.
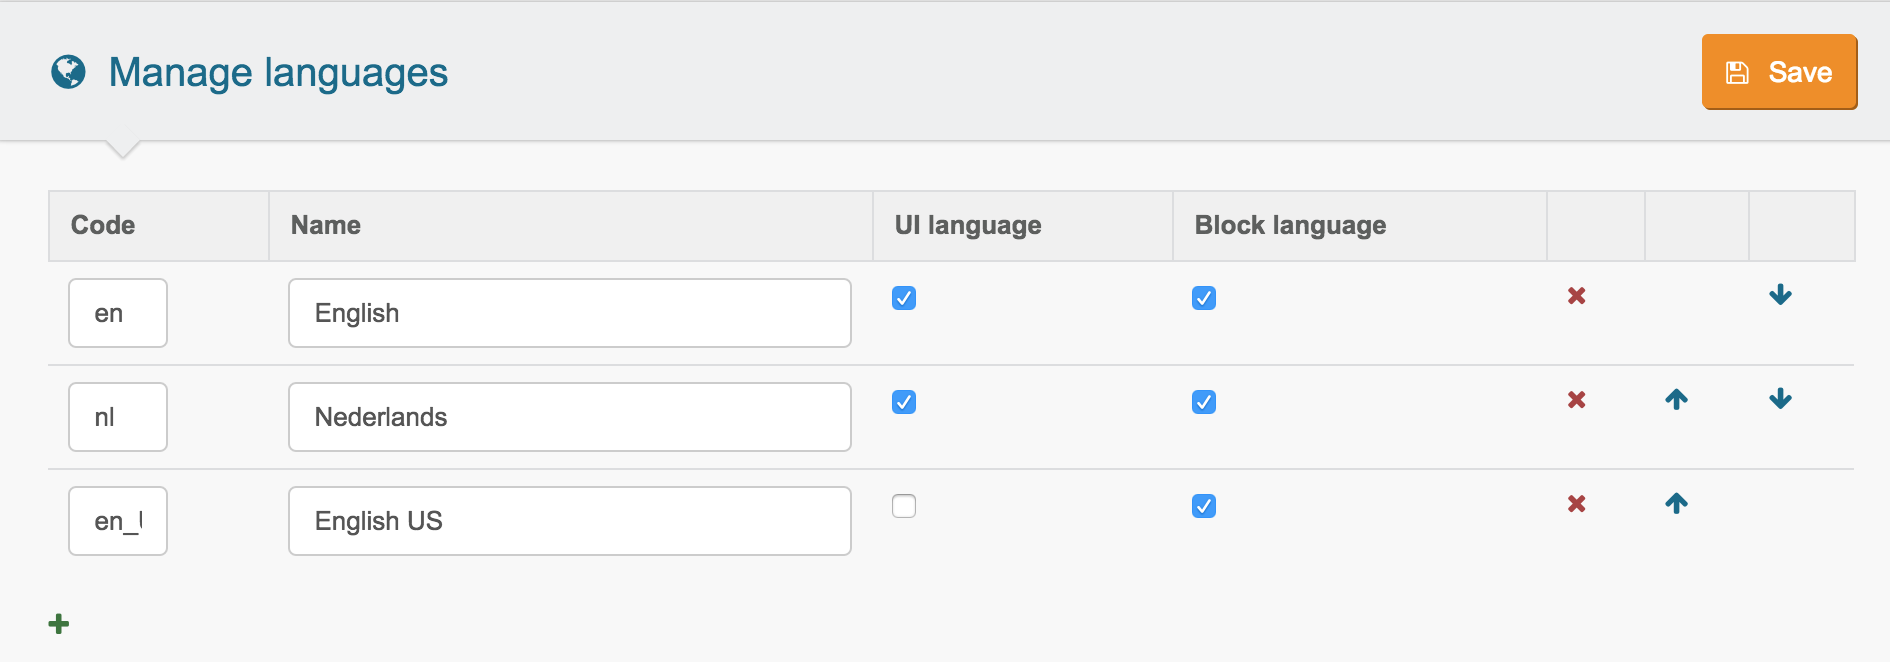
3.4.1. Configuring a language
-
Code: the locale value
-
Name: the name of the language, which is used to display it.
-
UI language: set if the language should be available in the web interface.
-
Block language: set if the language should be available for creating actual content.
The order of importance can be modified by up and down-buttons. The values can be added/deleted by clicking on the Add/Delete buttons.
3.4.2. Saving the language configuration
Save the language configuration by clicking on the Save button.
3.4.3. Using languages
Languages affect certain parts of Livedocs based on the UI language and Block language.
If the UI language is set:
-
Manage Block meta data / Manage Document meta fields can be defined in each configured language
-
Live Blocks / Live Document names can be defined in each configured language.
If the Block language is set:
-
Live Blocks content can be defined in each configured language.
-
Live Blocks spelling checker will use the configured language if a matching dictionary is available.
It is possible to add new dictionaries to add support for languages for which the default installation does not contain a dictionary.
4. Reference
4.2. LiveDocs Document Flow Step
This section describes the LiveDocs Document Flow step that is provided with LiveDocs. The Document Flow step can be used to generate previews or output from a Live Document Instance.
4.2.1. Step properties
This section describes the properties that can be set on the LiveDocs step to control its behavior.
-
account-name: The account name is the name of the account that contains the workspace specified by theworkspace-nameproperty. -
create-pages: When enabled, the step generates the output as separate XSL-FO page flow objects instead of letting the final output format perform pagination. This can be useful when you want to process pages individually (e.g.: add a barcode on each page, store the pages in the Page Store). It is better to leave this option disabled when not needed since it could impact performance. -
ignore-errors: When enabled the step will ignore any error that occurs during output generation and sends the error as a Flow Instance message instead. When disabled, errors are handled in the usual way. -
livedocs-instance: Specifies where to get the Live Document Instance from. This can be a file reference, data source data or use the input data (flow object) from the step. -
override-xsl: Allows you to override the default stylesheet used to generate XSL-FO. This allows you to perform custom styling and formatting in the output. This can be a file reference or data source data. If set tonone, the default LiveDocs stylesheet is used. For a starting point, you can get the default LiveDocs stylsheet by using the download link present in the wizard when editing this property in the Scriptura designer. -
template-processor: Specifies the location of the Template Processor to use for generating the output. -
work-in-memory: Specifies whether output generation should be performed in memory. This can affect performance. -
workspace-name: The name of the workspace that will be used as the root to locate any accompanying data. E.g.: for resolving referenced Reusable Objects.
For general step properties we refer you to the Scriptura Document Flow documentation.
4.3. LiveDocs JavaScript API
This section describes the JavaScript API that is provided with LiveDocs. By using this API, you can trigger actions from the embedding application. You could use a frameset, or include LiveDocs in your page via an iframe.
Below is some example code for using a frameset.
4.3.1. frameset.html
<html>
   <head>
      <title>Frameset Example</title>
   </head>
   <frameset rows="100px, 100%">
      <frame src="trigger.html"/>
      <frame name="FormFrame" src="/forms/livedocs/build-document?instance-path=e418f426-f3e3-4562-a60e-423233f40b9e.sli"/>
   </frameset>
</html>
4.3.2. trigger.html
<html>
   <head>
      <title>Trigger Example</title>
      <script type="text/javascript">
         function save()
         {
            parent.FormFrame.id.livedocs.builddocument.save(done);
         }

         function done(path)
         {
            document.getElementById("result").innerHTML = path;
         }
      </script>
   </head>
   <body>
      <div>
         <a href="javascript:save();">Save</a>
      </div>
      <div>
         Result: <span id="result"/>
      </div>
   </body>
</html>
| If you serve your own JavaScript code from another origin than LiveDocs then you need to perform additional setup. See Access JavaScript API from different origins. Otherwise the browser will not allow your code to access the LiveDocs JavaScript API. See Same Origin Policy for more information. |
4.3.3. Manage Live Blocks
Functions
-
id.livedocs.manageblocks.save(callback): Saves the current Block.
Parameters:-
callback (optional): The type is function. This method is called when the save completed successfully.+ The signature is function callback(path). The type of parameter path is string and it contains the location of the saved Block.
-
4.3.4. Manage Live Document Definitions
Functions
-
id.livedocs.managedocuments.save(callback): Saves the current Document Definition.
Parameters:-
callback (optional): The type is function. This method is called when the save completed successfully.+ The signature is function callback(path). The type of parameter path is string and it contains the location of the saved Document Definition.
-
4.3.5. Building Documents
Functions
-
id.livedocs.builddocument.save(callback): Saves the current Document Instance.
Parameters:-
callback (optional): The type is function. This method is called when the save completed successfully.+ The signature is function callback(path). The type of parameter path is string and it contains the location of the saved Document Instance.
-
-
id.livedocs.builddocuments.preview(action_id): Triggers a preview action.
Parameters:-
action_id (optional): The type is string. Indicates which preview action needs to be triggered.
This value corresponds to the ID as entered on the Manage actions screen.
The default value is default.
-
-
id.livedocs.builddocuments.send(action_id, callback): Triggers a preview action.
Parameters:-
action_id (optional): The type is string. Indicates which preview action needs to be triggered.
This value corresponds to the ID as entered on the Manage actions screen.
The default value is default. -
callback (optional): The type is function. This method is called when the send action completed successfully.+ The signature is function callback().
-
4.3.6. Access JavaScript API from different origins
To allow access from JavaScript running in another domain, there’s a script permanently hosted at the FrontEnd server to be used the calling application. It enables the cross-domain communication by using the cross-window messaging API.
The script source code is served at /forms/apps/livedocs/js/livedocs_client.js.
Use <script src="http://%frontend-server%:13342/forms/apps/livedocs/js/livedocs_client.js?version=1"></script> construction.
Since javascript files are cached, the version parameter makes sure that when a new version of LiveDocs is installed, the newest version of the script is loaded. Therefore in the application using the script the version parameter must be incremented each time a new version of LiveDocs is installed.
The provided script exposes the same API as the documented LiveDocs JavaScript API does.
Variable livedocs.domain must be set to the domain of the target LiveDocs application.
Below is the example code for setting the variable value. Note that before updating the variable value the livedocs_client.js script must be loaded into the calling application.
<script type="text/javascript"> id.livedocs.domain = 'http://localhost:13342'; </script>
The calling domain which is accessing the target LiveDocs application must be specified in the Scriptura configuration file. The option is: /config/server/livedocs/message-domain. See also Configuration.
4.4. LiveDocs XPath Functions
This section describes the XPath functions that are provided with LiveDocs. These functions are available when adding a data field in a Scriptura Template.
These functions return an XSL-FO fragment, which needs to be included in the output as-is.
To accomplish this, make sure you select Passthrough as Input format in the Data Field Formatting wizard page.
|
All functions are available in namespace http://www.inventivedesigners.com/livedocs/function-library.
4.4.1. Override XSL
Some functions allow to override the XSL Stylesheet that is used to convert the Live Block HTML to XSL-FO. Specify the URI of the XSL Stylesheet. This URI will be resolved against the URI of the template. You can use these functions if you would like to add features or extra styling.
4.4.2. Functions
-
live-blocks-by-path: Generates XSL-FO for Live Blocks.
Example:sldf:live-blocks-by-path('en', /root, 'blocks/001.slb')
Example:sldf:live-blocks-by-path('en', ., ('blocks/001.slb', 'blocks/002.slb'))
Example:sldf:live-blocks-by-path('en', /root/data, /root/blocks)
Parameters:-
language code: The code of the output language (as defined in Manage languages).
-
data node: The XML fragment that should be used for resolving data fields in the Live Blocks.
-
block paths: a relative path to a Live Block, or a sequence of paths. They are resolved against the current user’s active workspace.
-
-
live-blocks-by-path-override-xsl: Generates XSL-FO with an overridden XSL for Live Blocks. See Override XSL for details.
Example:sldf:live-blocks-by-path-override-xsl('en', ., 'override.xsl', 'blocks/001.slb')
Parameters:-
language code: The code of the output language (as defined in Manage languages).
-
data node: The XML fragment that should be used for resolving data fields in the Live Blocks.
-
XSL URI: The URI of the XSL that should override the built-in stylesheet.
-
block paths: a relative path to a Live Block, or a sequence of paths. They are resolved against the current user’s active workspace.
-
-
live-blocks-by-metadata: Generates XSL-FO for Live Blocks that match the given meta data.
Example:sldf:live-blocks-by-metadata('en', ., 'department', 'marketing', 'type', 'offer')
Parameters:-
language code: The code of the output language (as defined in Manage languages).
-
data node: The XML fragment that should be used for resolving data fields in the Live Blocks.
-
meta-key: The key of the meta data field to filter on (as defined in Manage meta data). The last two parameters can be repeated if you want to filter on more than one meta data field.
-
meta-value: The value to filter on. In case of translated values, provide the value, not one of the names. The last two parameters can be repeated if you want to filter on more than one meta data field.
-
-
live-blocks-by-metadata-override-xsl: Generates XSL-FO with an overridden XSL for Live Blocks that match the given meta data. See Override XSL for details.
Example:sldf:live-blocks-by-metadata-override-xsl('en', ., 'override.xsl', 'department', 'marketing', 'type', 'offer')
Parameters:-
language code: The code of the output language (as defined in Manage languages).
-
data node: The XML fragment that should be used for resolving data fields in the Live Blocks.
-
XSL URI: The URI of the XSL that should override the built-in stylesheet.
-
meta-key: The key of the meta data field to filter on (as defined in Manage meta data). The last two parameters can be repeated if you want to filter on more than one meta data field.
-
meta-value: The value to filter on. In case of translated values, provide the value, not one of the names. The last two parameters can be repeated if you want to filter on more than one meta data field.
-
5. Upgrade Information
5.1. Upgrading to 8.0
Keep the following in mind when upgrading to Scriptura LiveDocs 8.0 from an earlier release.
5.1.1. Resources
LiveDocs resources are now stored on the resource server. The workspace that should be used by LiveDocs, needs to be configured (see Configuration).
As a consequence, LiveDocs no longer works with IDs but with paths to identify resources (like Live Blocks, Live Document Definitions, etc.). The following components are affected:
-
LiveDocs web API: The request parameters that were used to pass an ID were renamed and now expect a path. Also, the path should be appended to a collection, to locate a certain resource.
-
LiveDocs JavaScript API: The callback functions now receive the path of saved Blocks or Document Definitions.
-
Integration: The request parameters of the web pages that wered used to pass an ID were renamed.
5.1.2. Backup/Restore
Since the Resource Server is used now, which has built-in support for backup and restore, the LiveDocs backup/restore functionality will be phased out. It is still possible to restore old backups in LiveDocs (because the format is different from Resource Server backups). The functionality to create backups was removed. Use the backup and restore functionality from the Configure Workspaces screen instead.
5.1.3. Pages
The Manage Live Blocks and the Manage Live Document Definitions page were split. There is now a separate to search and a separate page to edit a resource. See Manage Live Blocks and Manage Live Document Definitions.
5.2. Upgrading to 8.1
Keep the following in mind when upgrading to Scriptura LiveDocs 8.1 from an earlier release.
5.2.1. Embedding LiveDocs Web Application pages in iframes
As protection against clickjacking, the default Content-Security Policy (CSP) configuration has been changed from off to none. This means that, if any pages need to embed Scriptura Engage Web Applications in iframes, the /config/security/content-security-policy configuration property needs to be set.
|
Two security configuration options have been merged: /config/security/content-security-policy and /config/server/livedocs/message-domain. This means that /config/security/content-security-policy now configures authorized origins for iframes from Scriptura Engage’s Web Application, e.g. LiveDocs pages and deployed eForms, as well as authorized origins for message calls on the Javascript message API. Previously you could configure authorized origins for Javascript calls - separate from authorized ifeame sources - using the /config/server/livedocs/message-domain configuration property. That is no longer an option in Scriptura Engage 8.1. |
5.2.2. How to upgrade:
-
Set /config/security/content-security-policy/frame-ancestors/option to origins.
-
Move the authorized message origin domains from /config/server/htmlforms/message-domain in the previous configuration to /config/security/content-security-policy/frame-ancestors/origins in the new configuration.
-
Substitute the commas for spaces in /config/security/content-security-policy/frame-ancestors/origins.